把maven安排地明明白白
maven是常用java项目管理、打包工具。虽然说从做java开发的第一天就使用maven至今,但都是只知道用,从未深究过。每次遇到问题解决问题,没有对maven有全面的了解。最近打包什么的搞得越来越烦,决定一口气把maven安排个明明白白。记录学习过程如下:
参考文献
编译、链接与构建
其实学C语言时就没太搞清楚make的工作过程,而在看maven时,发现无论是make、ant或者maven,以及后来的gradle,其实其解决的最基础的一个问题都是:编译、链接与构建。作为基础知识,我把这一部分放在最前面。
其实这是个挺精密和复杂的过程,有一本书叫《程序员的自我修养——链接、装载与库》,整本书都在讲这个问题。如果看过,会对理解这部分有帮助。
简单来说,以文本文件形式存在的代码,必须经过编译,转换为适用于目标机器的二进制文件,才能运行。在C语言中,常见的编译工具就是GCC,对于像HelloWorld一样简单的程序,单独编译这个文件就可以运行,但对于大型软件项目,显然会有很多相互依赖,比如A文件依赖于B文件,那么在编译时我们就必须保证:
(1)只有在B文件编译完成后,才开始编译A文件。
(2)当B文件发生变化时,A文件会被重新编译。
而确定先编译这个,还是先编译那个,把一个大型软件项目中的N个代码文本按顺序编译的过程,就叫做构建。
理论上讲,一个软件要运行起来,它所依赖的所有代码文本要全部被编译成二进制文件才可以。一般来讲,我们的软件会依赖一些特别基础的包,这些包一般会成为相应语言的标准库,比如说C语言的stdio,同时会依赖一些第三方提供的库去实现特定的目标任务。从理论上讲,这些库和我们写的代码并没有本质区别,都是以操作计算机完成特定指令为目的。最早的时候,这些库代码的二进制文件也会被一同编译成一个目标文件,这样一个单独的二进制文件就可以运行。这叫做静态链接,即所有的库都打包到一个二进制文件中。
但是,因为这些库一般都比较稳定,并且被广泛使用,因此,假如每次都从源文件开始编译特别耗时且没有必要,而且像stdio这样几乎所有软件都要用到的库,如果每个软件都在自己的二进制文件中包含它们,每个软件都会变得体积庞大,而且一次bug fix就需要修改所有依赖它的软件、重新编译、构建,效率很低。因此,实际运行的绝大多数代码,其二进制文件中都不包含其运行所必须的库的二进制文件,而仅包含对这些二进制文件的引用声明,而这些被依赖的库保存于操作系统的特定位置,操作系统在装载这个二进制文件时,会将所需要库链接到相应的内存地址空间里,从而实现运行时的链接,这叫做动态链接。
可见,编译、构建和链接,是形成一个可执行二进制文件的必要过程。
一个软件肯定不可能只有一个源文件,而多个源文件还可能由不同的团队维护,因此,手工解决构建中谁先编译、谁后编译,哪些需要重新编译、哪些不需要重新编译的问题就变得非常复杂以至于不可能。因此,出现了一些工具去解决这个问题。在C语言的世界里,最流行的工具就是make。
java也是个编译型语言,它也面临着和C语言类似的问题。在java中,因为所有的class文件都要加载到JVM虚拟机中才可以运行,我们可以将其理解为运行时的动态链接,比如编译期没有问题,但运行时发生MethodNotFoundException,这一般都是因为依赖包版本问题导致“动态链接”失败,运行时找不到链接的方法符号。
因此,java也需要类似C语言的make一样的构建工具,帮助它管理构建过程。不然手动的构建实在太累人了。
简单总结:
代码从文本变成可执行文件,叫做编译(compile);先编译这个,还是先编译那个(即编译的安排),叫做构建(build)。
编译(compile),一般而言是将源代码转换成汇编代码,用以实现这种过程的工具称为编译器(compiler)。编译过程的输入文件是C / CPP / H等文本文件,输出是OBJ目标文件。要注意,编译器在同一时刻只能转换一个编译单元,所谓编译单元是指单个的源文件。
程序通常由多个编译单元组成,倘若逐个的去编译,这多少显得有点琐碎,因此我们需要一个自动化工具用来从源代码生成用户可以使用的目标,而这个工具就是构建系统(build system),构建系统所作的就是构建(build),构建的过程中肯定会调用到编译。从这个意义上来说,构建的范围比编译更广。
JAVA的类加载
在java中,没有类似于C语言的头文件和源文件的区分,(如果对为什么有头文件、源文件,可上面的知乎文章)。java的源代码编译后,只有一个class文件,在JVM虚拟机运行时,会发生面试时经常经常会被问起的问题:类加载。被加载到JVM虚拟机中的类就是最终的可执行代码。我们复习一下类加载的过程。
类的加载指的是将类的.class文件中的二进制数据读入到内存中,将其放在运行时数据区的方法区内,然后在堆区创建一个java.lang.Class对象,用来封装类在方法区内的数据结构。类的加载的最终产品是位于堆区中的Class对象,Class对象封装了类在方法区内的数据结构,并且向Java程序员提供了访问方法区内的数据结构的接口。
类加载器并不需要等到某个类被“首次主动使用”时再加载它,JVM规范允许类加载器在预料某个类将要被使用时就预先加载它,如果在预先加载的过程中遇到了.class文件缺失或存在错误,类加载器必须在程序首次主动使用该类时才报告错误(LinkageError错误)如果这个类一直没有被程序主动使用,那么类加载器就不会报告错误。
类加载的过程分为三步,装载、链接与初始化。这部分的详细过程与我们的内容无关,在这里我们省略。可参考上面的知乎文章。放一张简单的图来回忆一下:

我们这里主要展开两个问题:
类加载的时机
类在什么时候才会被装载呢?一个项目中可能有茫茫多的代码,依赖一大群一大群的,那么是否这些类都会被装载呢?从效率的角度显然不是如此。在大部分情况下应该是:在使用到的时候再去装载。所以,虽然JVM规范没有强制约束在何时进行加载(理论上一开始就把能找到的所有class都加载了也行),但规定了下列五种情况必须进行类加载(也称为类的初始化)
- 遇到 new、getstatic、putstatic、invokestatic 这四条字节码指令时,如果类没有进行过初始化,则必须先触发其初始化。最常见的生成这 4 条指令的场景是:使用 new 关键字实例化对象的时候;读取或设置一个类的静态字段(被 final 修饰、已在编译器把结果放入常量池的静态字段除外)的时候;以及调用一个类的静态方法的时候。
- 使用 java.lang.reflect 包的方法对类进行反射调用的时候,如果类没有进行初始化,则需要先触发其初始化。
- 当初始化一个类的时候,如果发现其父类还没有进行过初始化,则需要先触发其父类的初始化。
- 当虚拟机启动时,用户需要指定一个要执行的主类(包含 main() 方法的那个类),虚拟机会先初始化这个主类;
- 当使用 JDK.7 的动态语言支持时,如果一个 java.lang.invoke.MethodHandle 实例最后的解析结果为
REF_getStatic, REF_putStatic, REF_invokeStatic的方法句柄,并且这个方法句柄所对应的类没有进行过初始化,则需要先触发其初始化;
类加载器和双亲委托
我一直觉得双亲委托这个名字翻译地非常愚蠢。我开始总想不明白,不就是委托父加载器加载,父加载器只有一个, 怎么成了“双亲”呢?其实英文是“parents delegate”,我个人感觉就应该翻译成父类委托机制。这样多明确。本来就是只给程序员用的名词,就翻译地专业一点多好……好吧,吐槽到此为止。
首先来看类加载器,如其名,类加载器负责加载各种类。类加载器分为两种:
- 系统类加载器
- Bootstrap ClassLoader:启动类加载器
用来加载
JVM(Java虚拟机)运行时所需要的系统类,其使用c++实现。加载的路径是:
%JAVA_HOME%/jre/lib目录,如rt.jar、resources.jar、charsets.jar等- Extensions ClassLoader:扩展类加载器
具体实现是:ExtClassLoader
Extensions ClassLoader负责将
JAVA_HOME/jre/lib/ext或者由系统变量-Djava.ext.dir指定位置中的类库加载到内存中。- SystemAppClassLoader:系统类加载器
具体实现是:AppClassLoader
主要加载
Classpath目录下的的所有jar和Class文件,是程序中的默认类加载器。这里的Classpath是指我们Java工程的bin目录。也可以加载通过-Djava.class.path选项所指定的目录下的jar和Class文件。System.out.println(System.getProperty("java.class.path"));可以打印出其加载路径。这个路径其实就是当前Java工程目录bin,里面存放的是编译生成的class文件。 -
自定义类加载器
是由我们自己实现的,继承自
ClassLoader类的类加载器。这部分内容略进阶,和主题也无关,略过。
关于类加载器有两个重要结论:
- 所有类都有类加载器;
- 所有类加载器都有父加载器。(直到Bootstrap ClassLoader)
在查找对象时,类加载器使用双亲委托机制查找,所谓双亲委托机制,示例图如下:

简单地讲:
- 首先判断该Class是否已经加载
- 如果没有则不是自身去查找而是委托给父加载器进行查找,这样依次的进行递归,直到委托到最顶层的Bootstrap ClassLoader
- 如果Bootstrap ClassLoader找到了该Class,就会直接返回
- 如果没找到,则继续依次向下查找,如果还没找到则最后会交由自身去查找
使用双亲委托制的意义在于:
- 性能方面的考虑。避免重复加载,如果已经加载过一次Class,就不需要再次加载,而是先从缓存中直接读取。
- 安全方面的考虑。如果不使用双亲委托模式,就可以自定义一个String类来替代系统的String类,这样便会造成安全隐患,采用双亲委托模式会使得系统的String类在Java虚拟机启动时就被加载,也就无法自定义String类来替代系统的String类。
classpath与jar
By default only the packages of the JDK standard API and extension packages are accessible without needing to set where to find them. The path for all user-defined packages and libraries must be set in the command-line (or in the Manifest associated with the Jar file containing the classes, or var environment variables)
classpath的定义规则是,如果在运行java时,通过-cp指定了classpath,则使用该路径,如果没有指定,则查找环境变量中的CLASSPATH变量,如果没有找到,则使用当前工作目录作为classpath。
所以,假如我们定义了这么一个类。
package com.example;

public class Main{
    public static void main(String[] args){
        System.out.println("Hello world");
    }
}
放在/home/user/demo/文件夹下,则我们在编译后,需要在形成/home/user/demo/com/example/Main.class这样的目录结构,之后,我们通过java -cp /home/user/demo com.example.Main就可以执行看到输出。
这样通过文件夹拷贝一堆class文件的方式可以运行,但是不方便打包分发,所以jar包成了更常见的java程序分发格式。那么一个jar文件的classpath是怎么确定的呢?
为了弄清楚这个问题,我们绕个路,来了解一下jar包。
A JAR (Java ARchive) is a package file format typically used to aggregate many Java class files and associated metadata and resources (text, images, etc.) into one file for distribution. JAR files are archive files that include a Java-specific manifest file. They are built on the ZIP format and typically have a .jar file extension.
jar包可以被标准解压程序解压,或者通过
jar -xf example.jar解压。
jar包可以只包含各种工具类,而不包含入口函数。这些jar包就像C语言中的库文件,并不直接执行。而是被其他包引用。那么当其他程序引用这个jar包时,是怎么寻找这个jar包中的class文件的呢?一样是指定classpath,一个作为库的jar包可以认为就是一堆class文件的打包,其所处的目录就是其根目录,比如说,这样的目录结构
D:\myprogram\
      |
      ---> lib\
            |
            ---> supportLib.jar
      |
      ---> org\
            |
            --> mypackage\
                       |
                       ---> HelloWorld.class
                       ---> SupportClass.class
                       ---> UtilClass.class
那么要用到supportLib.jar中的类,命令行参数大概是这样
java -classpath D:\myprogram;D:\myprogram\lib\supportLib.jar org.mypackage.HelloWorld
但有些jar包可以直接执行。一般来说,这里的可执行表示可以通过java -jar命令执行,而不是像平台相关应用比如exe那样执行。(但jar包可以打包成平台相关格式,以使其直接可以执行)不同于上面说的直接在命令行通过java命令指定Main函数,它一般都通过manifest文件指定入口函数。如上所述,一个jar包里可能包含class文件、metadata、resources,同时还应当包括一个Manifest文件,来描述这个包里面的组织结构。manifest文件对于jar包至关重要,下面我们来了解一下manifest文件。
A manifest file is a metadata file contained within a JAR. It defines extension and package-related data. It contains name-value pairs organized in sections. If a JAR file is intended to be used as an executable file, the manifest file specifies the main class of the application. The manifest file is named
MANIFEST.MF. The manifest directory has to be the first entry of the compressed archive.The manifest appears at the canonical location META-INF/MANIFEST.MF. There can be only one manifest file in an archive and it must be at that location. It should be encoded in UTF-8.
而一个manifest文件中包含哪些key-value对,是由这个jar包用来干嘛决定的,比如说,我们打包的一个jar包,其manefist文件就是下面这样:
Manifest-Version: 1.0
Implementation-Title: Demo
Implementation-Version: 0.0.1-SNAPSHOT
Start-Class: com.lifestory.MyApplication
Spring-Boot-Classes: BOOT-INF/classes/
Spring-Boot-Lib: BOOT-INF/lib/
Build-Jdk-Spec: 1.8
Spring-Boot-Version: 2.1.8.RELEASE
Created-By: Maven Jar Plugin 3.2.0
Main-Class: org.springframework.boot.loader.JarLauncher
而如果多个jar包需要合作,即一个jar需要用到另一个jar,也需要在manifest文件中指定classpath,其key为Class-Path,value为空格隔开的多个路径,如Class-Path: . pkg1.jar path/to/pkg2.jar。该值相对路径,相对的是该jar包所在目录的位置,并且该值是该jar包运行时的最高优先级classpath,会覆盖环境变量和命令行指定的classpath。
jar包中的资源文件
解决了jar包如何正确加载类的问题,接下来又有一个问题,既然jar包中可能包含资源文件,那么这些资源文件怎么寻址?我们先从最简单的开始:
package com.example;

import java.io.BufferedReader;
import java.io.File;
import java.io.FileReader;
import java.io.IOException;

public class Main{
    public static void main(String[] args) throws IOException {
        File f = new File("./hello.txt");
        BufferedReader reader = new BufferedReader(new FileReader(f));
        String line;
        while ((line = reader.readLine()) != null) {
            System.out.println(line);
        }
    }
}
这样的一个文件,打包jar后运行,那么./hello.txt文件相对的将是:运行该jar包的工作目录。简单地讲,假如在java中使用了绝对路径去定位某个资源,那么java一定是从操作系统的该绝对路径去寻址,假如指定了相对路径,那一定是相对运行该jar包时的工作路径去寻址。一句话,假如你用路径的方式去定位一个资源文件,那么该资源文件打包进jar包后,原有的方式全都失效,这些代码在运行时就会出错。
所以为了正确加载jar包中的资源(假如我们手动加载的话),那就必须通过其他方式来完成:可参见这个链接
这也就解释了,为什么我们在IDE中能够正常寻址的文件,在打包成jar文件后就不能寻址了。因为在IDE中,我们要寻址的文件还处于正常的文件系统下,有目录结构,因此可以相对工作路径来寻址,而打包成jar后,这样的寻址方式就失败了。
在IDEA中,假如我们启动一个类,工作路径默认是项目根目录,可以通过以下方式指定:

这和maven有什么关系
maven作为一个项目管理工具,实际上其大部分工作就是上面的编译、链接与构建。从maven的发展过程来看,最早是ant代替了make,然后是maven代替了ant,其实接下来,gradle作为后起之秀,也占据了java项目管理的半壁江山,我们最后会提到gradle。当前,我们很多java开发使用maven来管理依赖和软件生命周期,最终打包成一个jar或者war发布。了解maven是做什么的,对于深入全面地了解maven、解决一些奇怪的问题是非常有必要的。
从make到ant,到maven
ant也是一个自动化的软件构建工具,最早用于apache的tomcat项目,后来发展为一个java世界里常用的包构建工具。ant也是apache基金会的一个项目。(java世界要是没了apache…………)
最早,tomcat在构建时,使用的是一个闭源的Make版本,在Solaris系统上构建,但tomcat本身是个开源软件,不可能说所有的贡献者都有相同的构建环境并且使用该闭源版本的make。因此,ant作为一个平台无关的构建工具,正式被开发出来,它使用XML文件作为构建文件。到2002年,ant已经是非常流行的构建工具了。使用ant,需要明确指定各个阶段要做什么工作,
比如,一个典型的build.xml文件可能如下所示:
<?xml version="1.0"?>
<project name="Hello" default="compile">
    <target name="clean" description="remove intermediate files">
        <delete dir="classes"/>
    </target>
    <target name="clobber" depends="clean" description="remove all artifact files">
        <delete file="hello.jar"/>
    </target>
    <target name="compile" description="compile the Java source code to class files">
        <mkdir dir="classes"/>
        <javac srcdir="." destdir="classes"/>
    </target>
    <target name="jar" depends="compile" description="create a Jar file for the application">
        <jar destfile="hello.jar">
            <fileset dir="classes" includes="**/*.class"/>
            <manifest>
                <attribute name="Main-Class" value="HelloProgram"/>
            </manifest>
        </jar>
    </target>
</project>
看这个build脚本简直没有任何难度,里面要干啥都写得清清楚楚。所以不解释了。
ant的功能比较单纯,就是来编译、构建。它的管理和构建是基于target这个概念进行的。每一个target定义了一个子任务,多个子任务完成一个完整的构建任务。它不包含依赖管理的能力,官方文档上也说明:
Software development projects looking for a solution combining build tool and dependency management can use Ant in combination with Apache Ivy.
需要依赖管理的话,就要和apache的其他项目配合使用了。
简单来看,ant虽然解决了某个阶段的问题,但仍然存在一些问题。简单地思考一下,至少包括:
- XML语义虽然自解释性很强,但很啰嗦。在大型项目里,这显然会变成一大堆文件,看着就头疼。
- 没有对java源码、资源文件的位置做出约定(而这正是maven的一大进步),导致每一个项目的构建风格都很不相同。不一致显然不是个好事情。
- 必须明确指定让ant做什么、什么时候做。这样其实一些大差不差的步骤也要写一堆啰嗦的东西。烦。
- 没有依赖管理。而依赖管理显然是java程序员的重要需求之一。
基于此,maven逐渐走入了人们的视线。
我们讲了这么多的基础知识,终于要开始安排Maven了。这次一定要至少让我自己把maven的概念搞得明明白白。
Maven简介
maven是什么
一个构建工具。但是,官方认为自己more than that.
When in the presence of Maven folks, speaking of a project is speaking in the philosophical sense, beyond a mere collection of files containing code. A project contains configuration files, as well as the developers involved and the roles they play, the defect tracking system, the organization and licenses, the URL of where the project lives, the project’s dependencies, and all of the other little pieces that come into play to give code life.
我来丑陋地翻译一下:
在maven人的世界里,说到项目,说到的是一个哲学理念,而不仅仅是一堆代码和文件的集合。一个项目包含很多东西,比如说:配置文件、所涉及的开发人员以及其在项目中扮演的角色、缺陷追踪系统、组织和许可证文件、项目所在的URL、项目的依赖,以及围绕此的一大堆零碎却也重要的小片段,这些东西共同赋予代码声明。
maven怎么做
maven将一些best practice固定成一套模式,比如说:
- 将有关项目构建的所有信息都统一保存在POM文件中,使得对其的修改对所有人可见;
- 有约定的文件目录结构,使得开发人员可以很容易理解其他项目的构建。也避免了ant文件过大的随意性。
- 对于约定俗成的步骤,比如说编译、构建、打包、测试,maven都默认执行,而不像ant是,所有步骤都必须自己指定。
- 提供统一的依赖管理,从而使多个项目组可以合作。
所以maven的想法就是统一、统一、统一。在软件开发的全周期进行统一,包括:测试,生成文档,生成指标和报告,测试和部署。以减少程序员在项目切换时遭遇的痛苦。正是基于这种思想,在maven里,一个APP的构建流程是固定的,只能在不同的流程阶段通过plugin来改变其行为。
从POM开始
POM是整个maven的核心文件,他的意思是:Project Object Model,它的物理存在形式,就是我们常见的pom.xml,他是一个项目的一站式配置中心,包含了所有该项目所需要的信息。在maven的世界里,一个项目甚至不用包含任何代码,仅仅包含一个pom.xml就够了。
Super POM
Super Pom是maven的默认pom,所有的pom文件除非特别指定,都扩展自Super POM,这意味着我们手动写的pom文件,都继承自这个POM,而那些特别指定了parent的POM文件,他们向其parent追溯,总能追溯到一个没有配置parent的POM文件,而这个文件当然也默认继承了Super POM文件。换句话说:Super POM是所有POM文件的root。
在Super POM文件中,为很多Maven相关的配置提供了合理的默认值,极大减轻了我们的配置负担。目前,最新的Maven3.6.3版本的Super POM文件在这里可以查看,复制如下,这里面的细节后面再回来看,现在仅引入这个概念:
<project>
  <modelVersion>4.0.0</modelVersion>

  <repositories>
    <repository>
      <id>central</id>
      <name>Central Repository</name>
      <url>https://repo.maven.apache.org/maven2</url>
      <layout>default</layout>
      <snapshots>
        <enabled>false</enabled>
      </snapshots>
    </repository>
  </repositories>

  <pluginRepositories>
    <pluginRepository>
      <id>central</id>
      <name>Central Repository</name>
      <url>https://repo.maven.apache.org/maven2</url>
      <layout>default</layout>
      <snapshots>
        <enabled>false</enabled>
      </snapshots>
      <releases>
        <updatePolicy>never</updatePolicy>
      </releases>
    </pluginRepository>
  </pluginRepositories>

  <build>
    <directory>{project.basedir}/target</directory>
    <outputDirectory>{project.build.directory}/classes</outputDirectory>
    <finalName>{project.artifactId}-{project.version}</finalName>
    <testOutputDirectory>{project.build.directory}/test-classes</testOutputDirectory>
    <sourceDirectory>{project.basedir}/src/main/java</sourceDirectory>
    <scriptSourceDirectory>{project.basedir}/src/main/scripts</scriptSourceDirectory>
    <testSourceDirectory>{project.basedir}/src/test/java</testSourceDirectory>
    <resources>
      <resource>
        <directory>{project.basedir}/src/main/resources</directory>
      </resource>
    </resources>
    <testResources>
      <testResource>
        <directory>{project.basedir}/src/test/resources</directory>
      </testResource>
    </testResources>
    <pluginManagement>
      <!-- NOTE: These plugins will be removed from future versions of the super POM -->
      <!-- They are kept for the moment as they are very unlikely to conflict with lifecycle mappings (MNG-4453) -->
      <plugins>
        <plugin>
          <artifactId>maven-antrun-plugin</artifactId>
          <version>1.3</version>
        </plugin>
        <plugin>
          <artifactId>maven-assembly-plugin</artifactId>
          <version>2.2-beta-5</version>
        </plugin>
        <plugin>
          <artifactId>maven-dependency-plugin</artifactId>
          <version>2.8</version>
        </plugin>
        <plugin>
          <artifactId>maven-release-plugin</artifactId>
          <version>2.5.3</version>
        </plugin>
      </plugins>
    </pluginManagement>
  </build>

  <reporting>
    <outputDirectory>${project.build.directory}/site</outputDirectory>
  </reporting>

  <profiles>
    <!-- NOTE: The release profile will be removed from future versions of the super POM -->
    <profile>
      <id>release-profile</id>

      <activation>
        <property>
          <name>performRelease</name>
          <value>true</value>
        </property>
      </activation>

      <build>
        <plugins>
          <plugin>
            <inherited>true</inherited>
            <artifactId>maven-source-plugin</artifactId>
            <executions>
              <execution>
                <id>attach-sources</id>
                <goals>
                  <goal>jar-no-fork</goal>
                </goals>
              </execution>
            </executions>
          </plugin>
          <plugin>
            <inherited>true</inherited>
            <artifactId>maven-javadoc-plugin</artifactId>
            <executions>
              <execution>
                <id>attach-javadocs</id>
                <goals>
                  <goal>jar</goal>
                </goals>
              </execution>
            </executions>
          </plugin>
          <plugin>
            <inherited>true</inherited>
            <artifactId>maven-deploy-plugin</artifactId>
            <configuration>
              <updateReleaseInfo>true</updateReleaseInfo>
            </configuration>
          </plugin>
        </plugins>
      </build>
    </profile>
  </profiles>

</project>
Minimal POM
因为Super POM的存在,一个项目的POM文件可以非常非常的简略,一个最小化的POM文件仅需包含以下内容:
<project>
  <modelVersion>4.0.0</modelVersion>

  <groupId>com.mycompany.app</groupId>
  <artifactId>my-app</artifactId>
  <version>1.0.9527</version>
</project>
- project
这是根元素
-
moldeVersion
官网说,这个标签的内容几乎不可能改变,始终设置为4.0.0,但这个标签却必须存在,interesting
-
groupId
这个项目组的Id
-
artifactId
这个项目的具体ID
-
version
当前项目的版本号
常见的POM标签
- project This is the top-level element in all Maven pom.xml files.
- modelVersion This element indicates what version of the object model this POM is using. The version of the model itself changes very infrequently but it is mandatory in order to ensure stability of use if and when the Maven developers deem it necessary to change the model.
- groupId This element indicates the unique identifier of the organization or group that created the project. The groupId is one of the key identifiers of a project and is typically based on the fully qualified domain name of your organization. For example
org.apache.maven.pluginsis the designated groupId for all Maven plugins. - artifactId This element indicates the unique base name of the primary artifact being generated by this project. The primary artifact for a project is typically a JAR file. Secondary artifacts like source bundles also use the artifactId as part of their final name. A typical artifact produced by Maven would have the form
<artifactId>-<version>.<extension>(for example,myapp-1.0.jar). - version This element indicates the version of the artifact generated by the project. Maven goes a long way to help you with version management and you will often see the
SNAPSHOTdesignator in a version, which indicates that a project is in a state of development. We will discuss the use of snapshots and how they work further on in this guide. - name This element indicates the display name used for the project. This is often used in Maven’s generated documentation.
- url This element indicates where the project’s site can be found. This is often used in Maven’s generated documentation.
- properties This element contains value placeholders accessible anywhere within a POM.
- dependencies This element’s children list dependencies. The cornerstone of the POM.
- build This element handles things like declaring your project’s directory structure and managing plugins.
上面这些,我们最常打交道的,也就是dependencies标签和build标签,其他标签并不需要频繁地改来改去。
示例如下:
<project xmlns="http://maven.apache.org/POM/4.0.0" xmlns:xsi="http://www.w3.org/2001/XMLSchema-instance"
  xsi:schemaLocation="http://maven.apache.org/POM/4.0.0 http://maven.apache.org/xsd/maven-4.0.0.xsd">
  <modelVersion>4.0.0</modelVersion>

  <groupId>com.mycompany.app</groupId>
  <artifactId>my-app</artifactId>
  <version>1.0-SNAPSHOT</version>

  <name>my-app</name>
  <!-- FIXME change it to the project's website -->
  <url>http://www.example.com</url>

  <properties>
    <project.build.sourceEncoding>UTF-8</project.build.sourceEncoding>
    <maven.compiler.source>1.7</maven.compiler.source>
    <maven.compiler.target>1.7</maven.compiler.target>
  </properties>

  <dependencies>
    <dependency>
      <groupId>junit</groupId>
      <artifactId>junit</artifactId>
      <version>4.11</version>
      <scope>test</scope>
    </dependency>
  </dependencies>

  <build>
    <pluginManagement><!-- lock down plugins versions to avoid using Maven defaults (may be moved to parent pom) -->
       ... lots of helpful plugins
    </pluginManagement>
  </build>
</project>
Project继承
语法
即POM文件之间的继承体系。正如上所属,所有的POM文件,除非特别指定,都继承自Super POM,但我们也可以通过在parent中增加parent标签,指定该Project的Parent,如下面的目录结构:
.
 |-- my-module
 |   `-- pom.xml
 `-- pom.xml
./pom.xml如下
<project>
  <modelVersion>4.0.0</modelVersion>

  <groupId>com.mycompany.app</groupId>
  <artifactId>my-app</artifactId>
  <version>1</version>
</project>
那么./my-module/pom.xml可以做如下设置
<project>
  <modelVersion>4.0.0</modelVersion>

  <parent>
    <groupId>com.mycompany.app</groupId>
    <artifactId>my-app</artifactId>
    <version>1</version>
  </parent>

  <groupId>com.mycompany.app</groupId>
  <artifactId>my-module</artifactId>
  <version>1</version>
</project>
表示my-module模块属于my-app的子项目。
这样的写法适用于你com.mycompany.app:my-app:1已经install、或者恰好是com.mycompany.app:my-module:1的上一级目录的情况,假如像下面的目录结构
.
 |-- my-module
 |   `-- pom.xml
 `-- parent
     `-- pom.xml
./my-module/pom.xml就要这么写:
<project>
  <modelVersion>4.0.0</modelVersion>

  <parent>
    <groupId>com.mycompany.app</groupId>
    <artifactId>my-app</artifactId>
    <version>1</version>
    <relativePath>../parent/pom.xml</relativePath>
  </parent>

  <artifactId>my-module</artifactId>
</project>
有什么用
子项目的配置会和父项目相关配置进行融合,包括以下内容:
- dependencies
- developers and contributors
- plugin lists (including reports)
- plugin executions with matching ids
- plugin configuration
- resources
特别的,在指定了parent POM以后,一个POM文件可以不设置groupId和version,这样它的groupId和version都取自parent POM。
Project聚合
project聚合和project继承差不多做的是同一个事情,只是说project聚合是在parent POM中指定子模块。这样的话,对一个parent POM执行maven命令时,这些命令也会同样在child project上执行。要执行项目聚合,必须执行下列两个步骤
- 将parent POM的packaging标签的值设为pom;
- 在parent POM中设置children POMs的文件夹,这个文件夹的路径是相对路径。
比如,这样的文件目录结构
.
 |-- my-module
 |   `-- pom.xml
 `-- pom.xml
parent POM可以设置成
<project>
  <modelVersion>4.0.0</modelVersion>

  <groupId>com.mycompany.app</groupId>
  <artifactId>my-app</artifactId>
  <version>1</version>
  <packaging>pom</packaging>

  <modules>
    <module>my-module</module>
  </modules>
</project>
而这样的目录结构
.
 |-- my-module
 |   `-- pom.xml
 `-- parent
     `-- pom.xml
parent POM就要设置成:
<project>
  <modelVersion>4.0.0</modelVersion>

  <groupId>com.mycompany.app</groupId>
  <artifactId>my-app</artifactId>
  <version>1</version>
  <packaging>pom</packaging>

  <modules>
    <module>../my-module</module>
  </modules>
</project>
继承VS聚合
懒得翻译了……
If you have several Maven projects, and they all have similar configurations, you can refactor your projects by pulling out those similar configurations and making a parent project. Thus, all you have to do is to let your Maven projects inherit that parent project, and those configurations would then be applied to all of them.
And if you have a group of projects that are built or processed together, you can create a parent project and have that parent project declare those projects as its modules. By doing so, you’d only have to build the parent and the rest will follow.
But of course, you can have both Project Inheritance and Project Aggregation. Meaning, you can have your modules specify a parent project, and at the same time, have that parent project specify those Maven projects as its modules. You’d just have to apply all three rules:
- Specify in every child POM who their parent POM is.
- Change the parent POMs packaging to the value “pom” .
- Specify in the parent POM the directories of its modules (children POMs)
POM文件中的变量
在POM文件中,为了统一管理代码中的一些变量,比如说:某个依赖的版本号,防止在多次更改时出错,Maven鼓励我们多使用变量。变量包含以下种类
- 预定义变量
指POM预定义的一些变量。其中又分为
- project model相关变量
指任何project根标签下面的非数组value,都可以通过连续点的方式引用,比如说:
${project.groupId},${project.version},${project.build.sourceDirectory}等等。要注意的是,这种引用方式要求被引用的是一个值,而不是一个xml object,并且这个值不能是数组,必须是具体的一个。这些变量都通过前缀
project来引用,之前的一些引用方式如直接使用或者使用pom作为前缀都已经废弃了。- 特殊变量
-
project.basedir
当前项目的根目录
-
project.baseUri
当前项目的根目录,但以一个URI的方式返回。
-
maven.build.timestamp
表示开始构建的时间。而这个时间戳的格式可以通过用户自定义变量
maven.build.timestamp.format来指定,并且这个格式要与SimpleDateFromat这个java类所能指定的格式一致。<project> ... <properties> <maven.build.timestamp.format>yyyy-MM-dd'T'HH:mm:ss'Z'</maven.build.timestamp.format> </properties> ... </project>
- 用户自定义变量
在properties标签下指定,示例如下:
<project>
...
<properties>
  <mavenVersion>3.0</mavenVersion>
</properties>

<dependencies>
  <dependency>
    <groupId>org.apache.maven</groupId>
    <artifactId>maven-artifact</artifactId>
    <version>{mavenVersion}</version>
  </dependency>
  <dependency>
    <groupId>org.apache.maven</groupId>
    <artifactId>maven-core</artifactId>
    <version>{mavenVersion}</version>
  </dependency>
</dependencies>
...
</project>
Profile in POM
虽然MAVEN致力于使java项目便携,这意味着尽量少依赖与本地文件系统相关的配置。比如说:所有的依赖都由中央仓库或者自己搭建的仓库来管理,所有的路径尽可能都是相对路径。但是,仍然有一些东西可能不能完全避免与文件系统相关。比如说:不同的人所处网络环境不同因此更换这些网络环境下中央仓库的镜像仓库等等。
对此,Maven的解决方案和Spring对于环境相关变量的解决方案并没什么不同,都是建立一个Profile区,然后用Profile中的相关变量去覆盖profile外pom文件变量中的设置。因为这种用法我反正没见过,所以这里就暂时不展开讲了,只提一点:
都有哪些Profile文件,这些Profile文件定义在哪里
- 逐项目的Profile文件。这个定义在各自的POM文件中,Maven建议,对那些可能改变软件行为的Profile,都统一定义在一个POM文件中。
- 逐用户的Profile。这个定义在每个用户的
%USER_HOME%/.m2/settings.xml文件里。我们最爱在这里面设置的就是添加中央仓库的镜像。(Wow,所以理论上可以在settings.xml中添加很多个人自定义的设置,只是在合作场景下不建议这么做就是了) - 全局Profile。这个定义在
${maven.home}/conf/settings.xml中,使用这个maven的所有用户都共享。估计常见的用途还是添加中央仓库镜像……
其中的覆盖规则,肯定是前面的覆盖后面的了。如果有兴趣了解更多,可以看看这里
关于POM的基本概念就说这些,下文会详细分析POM中可能出现的各种标签。
标准文件夹结构
上面已经说过,为了统一,maven约定了标准的文件夹结构,要求所有的项目的文件都按照该文件夹结构进行组织。其约定如下,这也是我们经常看到的文件结构(gradle沿用了这个文件夹结构……and,它甚至沿用了maven建立的依赖包仓库,哈哈~)
src/main/java |
Application/Library sources |
|---|---|
src/main/resources |
Application/Library resources |
src/main/filters |
Resource filter files(所以这玩意干嘛的) |
src/main/webapp |
Web application sources(这玩意又是干嘛的) |
src/test/java |
Test sources |
src/test/resources |
Test resources |
src/test/filters |
Test resource filter files |
src/it |
Integration Tests (primarily for plugins) |
src/assembly |
Assembly descriptors |
src/site |
Site |
LICENSE.txt |
Project’s license |
NOTICE.txt |
Notices and attributions required by libraries that the project depends on |
README.txt |
Project’s readme |
依赖管理
新手接触maven,经常摆弄、使用频率最高的功能,无疑是maven的依赖管理功能。同样的,依赖管理也是Maven的核心功能之一。显然,独立的项目管理依赖比较简单,但多个项目的依赖管理就比较麻烦了。依赖管理要处理的问题包括:
- 依赖保存在哪里;
- 依赖怎么引入;
- 依赖冲突怎么解决;
我们依次来看。
首先:一个较为完整的示例
<project xmlns="http://maven.apache.org/POM/4.0.0" xmlns:xsi="http://www.w3.org/2001/XMLSchema-instance"
  xsi:schemaLocation="http://maven.apache.org/POM/4.0.0 https://maven.apache.org/xsd/maven-4.0.0.xsd">
  ...
  <dependencies>
    <dependency>
      <groupId>junit</groupId>
      <artifactId>junit</artifactId>
      <version>4.12</version>
      <type>jar</type>
      <scope>test</scope>
      <optional>true</optional>
    </dependency>
    ...
  </dependencies>
  ...
</project>
Maven 坐标
如上文所述,一个minimal POM必须包含的标签就有groupId:artifactId:version,这三个标签合起来就是这个包在maven宇宙中的坐标了。在任何时候,我们总能根据这个坐标找到一个maven项目。
- groupId: This is generally unique amongst an organization or a project. For example, all core Maven artifacts do (well, should) live under the groupId
org.apache.maven. Group ID’s do not necessarily use the dot notation, for example, the junit project. Note that the dot-notated groupId does not have to correspond to the package structure that the project contains. It is, however, a good practice to follow. When stored within a repository, the group acts much like the Java packaging structure does in an operating system. The dots are replaced by OS specific directory separators (such as ‘/’ in Unix) which becomes a relative directory structure from the base repository. In the example given, theorg.codehaus.mojogroup lives within the directory$M2_REPO/org/codehaus/mojo. - artifactId: The artifactId is generally the name that the project is known by. Although the groupId is important, people within the group will rarely mention the groupId in discussion (they are often all be the same ID, such as the MojoHaus project groupId:
org.codehaus.mojo). It, along with the groupId, creates a key that separates this project from every other project in the world (at least, it should 🙂 ). Along with the groupId, the artifactId fully defines the artifact’s living quarters within the repository. In the case of the above project,my-projectlives in$M2_REPO/org/codehaus/mojo/my-project. - version: This is the last piece of the naming puzzle.
groupId:artifactIddenotes a single project but they cannot delineate which incarnation of that project we are talking about. Do we want thejunit:junitof 2018 (version 4.12), or of 2007 (version 3.8.2)? In short: code changes, those changes should be versioned, and this element keeps those versions in line. It is also used within an artifact’s repository to separate versions from each other.my-projectversion 1.0 files live in the directory structure$M2_REPO/org/codehaus/mojo/my-project/1.0.
只要给出这个坐标,maven就会准确地定位到依赖的具体位置。不过maven在以上的三元组坐标以外,还提供了一个辅助定位的东西,官方称之为”classifier”
The classifier distinguishes artifacts that were built from the same POM but differ in content. It is some optional and arbitrary string that – if present – is appended to the artifact name just after the version number.
As a motivation for this element, consider for example a project that offers an artifact targeting Java 11 but at the same time also an artifact that still supports Java 1.8. The first artifact could be equipped with the classifier
jdk11and the second one withjdk8such that clients can choose which one to use.Another common use case for classifiers is to attach secondary artifacts to the project’s main artifact. If you browse the Maven central repository, you will notice that the classifiers
sourcesandjavadocare used to deploy the project source code and API docs along with the packaged class files.
这个也比较好理解,运行以下命令。
$ pwd
~/.m2/repository/org/springframework/boot/spring-boot/1.5.3.RELEASE
$ ls
_remote.repositories
spring-boot-1.5.3.RELEASE-javadoc.jar
spring-boot-1.5.3.RELEASE-javadoc.jar.lastUpdated
spring-boot-1.5.3.RELEASE-javadoc.jar.sha1
spring-boot-1.5.3.RELEASE-sources.jar
spring-boot-1.5.3.RELEASE-sources.jar.lastUpdated
spring-boot-1.5.3.RELEASE-sources.jar.sha1
spring-boot-1.5.3.RELEASE.jar
spring-boot-1.5.3.RELEASE.jar.lastUpdated
spring-boot-1.5.3.RELEASE.jar.sha1
spring-boot-1.5.3.RELEASE.pom
spring-boot-1.5.3.RELEASE.pom.lastUpdated
我们可以看到用横线后面的东西,就是javadoc和source。如果要更精确地说,classifier和上述三元组坐标,才是最终·真正唯一的项目坐标。
Maven 仓库
maven仓库存储构建好的artifact和各种形式的依赖文件。仓库就是maven根据坐标去寻找依赖的地方。仓库分为两类:本地仓库和远程仓库。
- 本地仓库是maven所运行的电脑上的一个文件夹,它的作用主要是缓存远程仓库中下载的各种依赖,以及暂时保存你尚未发布的项目(artifact)
- 远程仓库是指任何其他形式的仓库,可以通过多种多样的协议访问,比如
file://,https://等等。这些仓库可以是一个真正的远程仓库,由一个第三方组织设立用以发布各种artifact,比如说maven中央仓库(central repository),或者说是一个内网仓库,由你所在的公司、组织设立,用来分享一些私有的artifact。
在上文的Super POM一节,我们看到了中央仓库的配置。
<repositories>
  <repository>
    <id>central</id>
    <name>Central Repository</name>
    <url>https://repo.maven.apache.org/maven2</url>
    <layout>default</layout>
    <snapshots>
      <enabled>false</enabled>
    </snapshots>
  </repository>
</repositories>
比如说,我们常做的事就是嫌官方源慢,把官方源改成阿里源,就在settings.xml里面加一句:
<mirrors>
  <mirror>
    <id>alimaven</id>
    <name>aliyun maven</name>
    <url>http://maven.aliyun.com/nexus/content/groups/public/</url>
    <mirrorOf>central</mirrorOf>
  </mirror>
</mirrors>
或者在公司里肯定会用到公司的源,这我就不举例了。
一个完整的repository关系图大概是下面这样的(官网图):
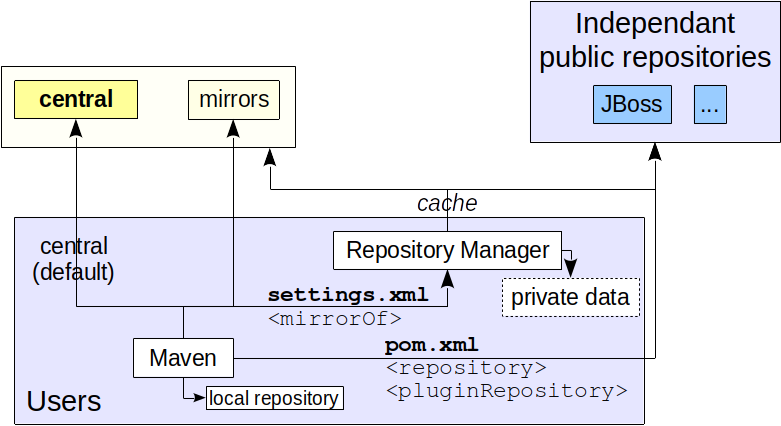
当然,如果有权限的话,你还可以向仓库里push项目。
需要的依赖maven仓库没有
既然所有的maven项目都是以groupId:artifactId:version这种坐标的方式给出的,那么是否意味着我们的项目只能依赖maven提供的依赖呢?maven的答案是: “Of course, but that’s a good thing.” 我个人也认为这是个好事,因为只有如此才能保证最大的便携性,何况现在maven仓库已经是java开发的标准,你要用到的依赖maven几乎肯定是有。
但是,在某些情况下,一个依赖的确不可能从maven的中央仓库下载下来,可能是因为它是个闭源项目(比如人见人烦的oracle-jdbc驱动)。此时,maven提供了三种解决途径:
- (推荐)使用maven的官方的install插件,将你本地文件系统的包安装到本地仓库里面去。如下:
mvn install:install-file -Dfile=non-maven-proj.jar -DgroupId=some.group -DartifactId=non-maven-proj -Dversion=1 -Dpackaging=jar我们在这里把一个本地的jar包保存到本地的仓库中去了,同时,赋予它一个
groupId:artifactId:version三元组作为坐标,这样,在我们本地的所有项目中,我们都可以以此坐标引用该依赖了; -
(推荐)建立内网仓库。显然公司最爱用这种方式。这样不仅可以在同一个项目的多个合作成员之间共享代码,还能保证代码的私密性。
-
(不推荐)使用依赖的system scope,指定本地jar包在本地文件系统中的位置。这是最不推荐的,因为破坏了便携性(虽然你可以用git这种工具把这个jar包在项目组成员之间共享,从而提供类似内网仓库的效果)
部署自己开发的包
部署到本地仓库
如上所述,可以这样:
mvn install:install-file -Dfile=<path-to-file> -DgroupId=<group-id> -DartifactId=<artifact-id> -Dversion=<version> -Dpackaging=<packaging>
如果你有个pom文件来描述这个jar包,那么还可以这样:
mvn install:install-file -Dfile=<path-to-file> -DpomFile=<path-to-pomfile>
假如你用2.5以上的install插件,并且这个jar包就是maven打包的(这意味着maven其实会在jar包的META-INF/文件夹下保存一个pom副本),还可以这样:
mvn org.apache.maven.plugins:maven-install-plugin:2.5.2:install-file -Dfile=<path-to-file>
第三种方式里,我们明确指出了所有插件的坐标,这个坐标和包的坐标非常类似。
部署到远程仓库
mvn deploy:deploy-file -DgroupId=<group-id> \
  -DartifactId=<artifact-id> \
  -Dversion=<version> \
  -Dpackaging=<type-of-packaging> \
  -Dfile=<path-to-file> \
  -DrepositoryId=<id-to-map-on-server-section-of-settings.xml> \
  -Durl=<url-of-the-repository-to-deploy>
<dependency>的几个子标签
scope
该特性允许你仅仅在构建的某个阶段使用该依赖。该特性可以通过在依赖中指定scope标签来启用,如:
<dependency>
    <groupId>group-a</groupId>
    <artifactId>artifact-b</artifactId>
    <version>1.0</version>
    <scope>runtime</scope>
</dependency>
这将会把相关依赖限制在某个特定的构建阶段,只有在当前阶段和scope相同时,才会把相关依赖包括在classpath下。
总共有6个可选scope
- compile
默认域。compile依赖会在所有阶段都加入项目的classpath,而且还会影响它的子项目。
-
provided
这和compile比较接近,但该域的值表明你期待JDK或者一个container在运行时提供这些依赖。比如说:当你构建一个web app时,你可能将Servlet API和Java EE API相关依赖设为provided,因为这些依赖可能由web container提供。当一个依赖的域被指定为provided时,它会被用于编译和测试,但不会在运行时被包含在内。
这个依赖是非递归的(但非递归具体什么含义我还没明白。是指这些依赖的依赖不会被包含在内?因为理论上container也会提供)
-
runtime
这个域表明这个依赖在编译阶段用不到,但在执行阶段会用到。maven会在运行时以及测试时将该依赖包含在classpath中,但在编译时不会包含。这种比较典型的就是各种JDBC的连接依赖。因为最原始的写法都是在JDBC里forClass,所以在编译期用不到这些依赖。但运行时需要。
-
test
表示只有在测试编译和测试执行时会用到。这种依赖一般都是测试库,比如说Junit和Mockito这类的库。
-
system
官方文档标注:
Important note: This is deprecated.这个域的效果接近provided,但是你必须提供基于当前文件系统的一个路径,指定具体的jar包。这比如说傲娇的oracle数据库连接,就无法从中央仓库找到,只能下载个jar包,一般就用这种方式提供了。因为这是操作系统相关,所以一般不推荐使用(破坏了便携性),并且在默认情况下,该scope的依赖不会被spring的打包插件自动打包进去,需要添加设置如下:
<build> <plugins> <plugin> <gropuId>org.springframework.boot</gropuId> <artifactId>spring-boot-maven-plugin</artifactId> <configuration> <inculdeSystemScope>true</inculdeSystemScope> </configuration> </plugin> </plugins> </build> - import
这个域比较复杂,解释起来还牵扯到另外一个重要的依赖管理功能,因此在之后我们再单独介绍。
optional
假设有个项目X2,这个项目的功能类似于Hibernate,它能够帮我们自动生成连接mysql、PostgreSQL和Oracle,所以在构建X2时,这三种数据库的JDBC Connector都必须存在,但我们的项目在使用X2时,其实比如说只用到了mysql,那么,我们的项目其实就不需要把X2的所有依赖的JDBC Connector都包含进来,只包含mysql就够了。在这种情况下,X2就可以把它所以来的JDBC connector声明为optional,这样,对于X2项目来说,这些依赖对他们来说和正常的依赖没什么区别。但是,当我们引用X2时,这些optional的依赖不会被递归引用,而必须在我们的项目依赖中显式指定。
这就是optional存在的意义。但是文档中同时也提到,这只是个权宜之计(stop-gap solution)最好的办法是,将X2拆开成三个项目,mysql-X2,PostgreSQL-X2,Oracle-X2,然后各自都有必须依赖的依赖项。但是在某些情况下确实没法将项目拆分,那么就使用optional来实现以上功能即可。
exclutions
因为maven是递归依赖的,所以就有可能有一些我们不想要的依赖被include进来,此时用exclutions去除即可。
递归依赖与版本冲突
几个事实:
- maven提供递归依赖,而且只要依赖不成环,对依赖层数没有限制;
- maven从你项目的依赖的pom文件中读取该依赖的依赖、该依赖的parent的依赖。
因此,当项目膨胀,依赖会迅速膨胀。很显然会出现这样的情况,即我的项目依赖了A和B,但A和B都依赖了C,但却依赖了C的不同版本,那么当进程真的运行起来时,到底哪个版本的C会被真正加载呢?maven有一些默认规则来确认哪些依赖应该被包括在内。总体上有下列几个原则。
最近依赖原则
当依赖版本出现冲突时,Maven根据最近路径原则来决定使用哪个依赖,这个最近路径,是指从你的项目根开始计算的依赖树的高度,假如高度一样,那么声明在前的有效。因此,假如你想明确指定某个依赖的版本,就将他直接定义在你的POM文件里,这是绝对有效的,定义在子pom文件中的依赖版本将会覆盖父pom文件中的依赖版本。
# 这将选择D 1.0
 A
 ├── B
 │   └── C
 │       └── D 2.0
 └── E
 └── D 1.0

# 下面的将选择D 2.0
A
├── B
│   └── C
│       └── D 2.0
├── E
│   └── D 1.0
│
└── D 2.0

# 下面将选择D 1.0
A
├── B
│   └── D 1.0
├── C
│   └── D 2.0
直接指定
其实这是最近依赖的自然扩展,就算你不直接使用某个依赖,你也依然可以在POM中指定它,这么之后所有间接应用到该依赖的地方,都会使用你指定的版本。比如上面的第二个例子,A项目虽然不直接使用D,但它指定了D使用2.0版本,那么最终整个项目里使用的都是D 2.0版本
统一管理依赖版本
在很多情况下,我们希望统一管理项目依赖版本。或许是因为,作为一个大型项目的多个子项目,我们希望他们使用依赖版本是统一的,从而减少项目合作时冲突的可能性,或许是,作为一个组织的管理者,出于安全目的的考虑,需要强制升级一个有安全漏洞的依赖到更高版本。无论出于什么目的,统一管理多个项目的依赖版本都是一个非常合理的需求。
为实现这个目的,有两种途径。
在父pom文件中定义dependency
众所周知,在父pom中定义dependency标签,则所有的子项目都会继承这个设置,相当于所有子项目也引入了这些依赖,除非子项目特别指定了相同依赖的不同版本,不然子项目就会使用父pom中的依赖版本。
这么做有好处,就是可以大幅度精简子POM文件中的dependency标签里的内容,但不好之处在于,有时候,子项目其实不需要某些依赖,但仍然被强制引入了。
dependencyManagement
这是maven提供的一个重要功能。其用法如下:在父POM的dependencyManagement标签中,声明子模块可能用到的所有依赖,以及其版本,而子模块在其dependency标签中,仅声明自己需要使用的依赖的groupId和artifactId即可,此时,子项目即引入了该artifact的,父POM中定义的版本。举例如下:
父POM:
<dependencyManagement>
    <dependencies>
        <dependency>
            <groupId>org.springframework.cloud</groupId>
            <artifactId>spring-cloud-starter-feign</artifactId>
            <version>{spring-cloud-starter-feign.version}</version>
        </dependency>
        <dependency>
            <groupId>org.springframework.boot</groupId>
            <artifactId>spring-boot-starter-aop</artifactId>
            <version>{spring.boot.version}</version>
        </dependency>
        <dependency>
            <groupId>org.aspectj</groupId>
            <artifactId>aspectjrt</artifactId>
            <version>${aspectjrt.version}</version>
        </dependency>
    </dependencies>
</dependencyManagement>
子POM:
<dependencies>
    <dependency>
        <groupId>org.springframework.boot</groupId>
        <artifactId>spring-boot-starter-aop</artifactId>
    </dependency>
</dependencies>
这样子模块不需要指定version,version是由父模块直接指定了,我们在使用Spring时,时常用到这种特性,如下面的POM文件:
<?xml version="1.0" encoding="UTF-8"?>
<project xmlns="http://maven.apache.org/POM/4.0.0"
         xmlns:xsi="http://www.w3.org/2001/XMLSchema-instance"
         xsi:schemaLocation="http://maven.apache.org/POM/4.0.0 http://maven.apache.org/xsd/maven-4.0.0.xsd">
    <modelVersion>4.0.0</modelVersion>

    <groupId>org.example</groupId>
    <artifactId>example</artifactId>
    <version>1.0-SNAPSHOT</version>

    <parent>
        <groupId>org.springframework.boot</groupId>
        <artifactId>spring-boot-starter-parent</artifactId>
        <version>2.2.2.RELEASE</version>
    </parent>

    <dependencies>
        <dependency>
            <groupId>org.springframework.boot</groupId>
            <artifactId>spring-boot-starter-web</artifactId>
            <!-- 这里就不用指定版本号了,也避免了版本号太多哪里贴错了 -->
        </dependency>
    </dependencies>

</project>
使用dependencyManagement有以下好处:
- 依赖统一管理。在parent中定义,需要变动版本只需要修改一处即可。
- 子model依赖版本不容易出错、不容易出现依赖冲突。
- 和直接在parent中定义
<dependency>不同,子module不会直接引入<dependencyManagement>中定义的依赖,而必须在子模块中显式声明(但不用声明版本号,版本号在parent POM中指定了),但如果定义在<dependency>中,子模块就会直接继承这些依赖。
所以dependencyManagement是统一管理依赖的最佳选择。
dependencyManagement与import scope
dependencyManagement当然好用,但也有个小问题。就是假如父模块需要管理的子模块实在太多,父POM文件中dependencyManagement标签下的内容会不断增多,这样看起来父POM文件会非常大,而且看起来也比较混乱。为解决这个问题,maven允许用户将一个父POM的dependencyManagement中的依赖拆开,按用户自己的标准拆成多个pom文件,然后再将这些pom文件导入到父POM文件的dependencyManagement标签下面,导入就是import,这就是import域存在的意义。
因此:import scope只能出现在dependencyManagement这个标签里,他导入的是其他pom文件中dependencyManagement的相关内容。
这就好理解了。
在我们自己的模块中,我们也可以使用dependencyManagement来管理依赖版本,这里就可以使用import,来import其他模块中的依赖。这就变相突破了maven单parent的限制,在我们需要导入其他POM文件的依赖,但当前又已经指定了parent的情况下比较好用。而且这种依赖是可选导入的。
另外需要注意的是,假如父pom的dependencyManagement中某个依赖的版本和子pom的dependencyManagement中指定的版本不一致,那么以子pom文件为准,假如dependencyManagement中的版本和dependency中的版本不一致,以dependecy中的版本为准。这就意味着,我们在子pom中的dependency中指定具体的版本号,可能会破坏通过父pom来统一控制版本的意图,而一般来讲,版本号统一还是很重要的,所以在子POM中直接指定版本号的操作需要慎重。
lifecycle
简介
如上所述,maven在设计上贯彻了“让不同软件的开发全周期尽量统一”的思想。对于maven来说,其核心概念就是生命周期(lifecycle)。每一个生命周期定义了一系列步骤,用来帮助用户实现一定的软件构建目的。maven中有三个内置的生命周期:
default, clean and site. The
defaultlifecycle handles your project deployment, thecleanlifecycle handles project cleaning, while thesitelifecycle handles the creation of your project’s site documentation.
每一个不同的生命周期都由一系列build phases组成,一个build phases就是生命周期的一个阶段。比如说,default lifecycle包含以下几个主要phases(有一些小步骤没列出来):
validate– validate the project is correct and all necessary information is availablecompile– compile the source code of the projecttest– test the compiled source code using a suitable unit testing framework. These tests should not require the code be packaged or deployedpackage– take the compiled code and package it in its distributable format, such as a JAR.verify– run any checks on results of integration tests to ensure quality criteria are metinstall– install the package into the local repository, for use as a dependency in other projects locallydeploy– done in the build environment, copies the final package to the remote repository for sharing with other developers and projects.
这里面,每一个步骤都属于一个生命周期,并且有严格的先后顺序,我们执行任意一个phases,就默认执行了这个phases所属生命周期之前的所有phases(为了打字顺畅,之后的phases我都敲成汉字:步骤)
这些步骤都可以在命令行执行,我们常用的打包命令,mvn clean package打包jar文件,意味着执行了clean的lifecycle中clean这个步骤之前的所有步骤,并执行clean的lifecycle的clean步骤,之后再执行package之前的所有步骤,并执行package。(clean lifecycle下有一个clean步骤,注意区分这两者的不同)
每一个步骤,都由0个或多个Plugin Goals构成。也就是说,每一个生命周期的步骤都是精确定义、并且严格约定了先后顺序的,但是,每个阶段最终执行了哪些具体任务却可以定义,即:我们可以通过定义绑定在每个步骤上的插件目标,来调整每个步骤的具体行为。
一个插件目标代表了一个特定的任务,比一个步骤更加精细。一个goal可以绑定到0个或者多个构建步骤中去,如果绑定了构建步骤,那么在执行对应构建步骤时,该goal就会被执行。但即使一个goal没有绑定任何构建步骤,也仍然可以被直接调用。goal的调用顺序将依赖于其所处的构建步骤、以及在构建步骤里的顺序来执行。如果一个goal被绑定在多个步骤里,他将多次被执行。假如一个步骤没有绑定任何goal,这个构建步骤将被跳过。
所以,使用maven的构建功能时,最重要的是控制plugin goal的顺序和行为。
每一个lifecycle包含哪些步骤、每个步骤和哪些插件的哪些goal绑定,在这里可以看到。
使用lifecycle
生命周期的概念非常容易理解,但是当我们构建一个project时,怎样为不同的构建步骤分配任务呢?官方建议有三种方式:
<packaging>
这是最常见的一种方式,即在pom文件的<project>顶级元素下面增加<packaging>标签。可选的value包括:jar、war、ear和pom。ear是指Enterprise Archive File,通常是EJB打包的,现在并不是非常常见。而jar、war、和pom都是常见的打包格式。
jar一般作为给其他包的库使用,或独立运行的文件使用,而war包主要是给tomcat部署使用,pom一般用于父模块管理多个子模块时,父模块的构建方式(父模块只包含pom,这种情况一般都是为了统一管理所有子项目的依赖版本)
每个packaging的value都已经预设了一系列的goals,这些goals都由官方提供的个插件提供,并绑定到了指定的步骤上。一个典型的绑定可以在这里查阅。
有些packaging类型需要在<build>标签下包含特定的插件,并且为插件配置好<extensions>true</extensions>。
plugins
这种方式更为灵活,允许用户手动绑定goals到不同的步骤之中。一个plugin也和maven所管理的其他项目依赖一样,使用groupId、artifactId、version来定位。每个plugin可以提供多个goal,每个goal代表该插件的某项能力,每个goal可以绑定到不同的步骤上,对于每一个goal,插件都可以包含这些goal适用于哪些步骤的信息。比如说:
Compiler插件包含了两个goal,一个是compile,这个绑定到compile步骤上,而testCompile,就绑定在test-compile步骤上。
因此,为了使用一个plugin,我们至少需要指定,这些plugin怎么定位(提供它的groupId、artifactId和version)信息,需要执行哪个goal(这些goal知道自己要在哪个步骤执行),以及为这些goal指定参数。如下:
<plugin>
    <groupId>org.codehaus.modello</groupId>
    <artifactId>modello-maven-plugin</artifactId>
    <version>1.8.1</version>
    <executions>
        <execution>
            <configuration>
                <models>
                    <model>src/main/mdo/maven.mdo</model>
                </models>
                <version>4.0.0</version>
            </configuration>
            <goals>
                <goal>java</goal>
            </goals>
        </execution>
    </executions>
</plugin>
这里之所以要有executions这个标签,是因为这样允许用不同的configuration多次运行同一个goal,这些goal运行的顺序和execution标签的顺序一致。我们可以为每个execution标签指定一个id,以便在POM文件合并时,这些execution的配置被合并到一起。
Build and plugin
简介
上面已经介绍了lifecycle的概念。对于maven来说,三个lifecyle是固定的,每一个lifecycle都有固定的步骤。官网:lifecycle绑定的步骤中列出了每个lifecycle绑定的具体步骤。而对于maven行为的定制化,全部依靠plugin来完成。
官网有云:
Whenever you want to customise the build for a Maven project, this is done by adding or reconfiguring plugins.
这句话表明了plugin在maven中的重要地位,实际上,我们可以把maven中默认提供的很多构建功能,也认为是以插件的形式提供的。在maven中,有两种plugin,build和reporting
build插件在build期间执行,在POM文件中在build标签中指定;
reporting插件在网站生成过程中执行,在POM文件中在reporting标签中指定。
所有的插件和依赖一样,都必须指定groupId, artifactId 和version,在不指定的情况下,默认使用该插件的最新版本。但是,官方文档建议,最好为所有的插件都指定明确的版本,以确保他们的行为可预期。和依赖管理的dependencyManagement一样,可以在父POM的build标签中指定<build><pluginManagement/></build>,来管理子模块中的插件版本。
引入插件
在POM文件中增加<build>标签,即可在<build>标签下引入、配置插件。最简单的一个插件引入如下:
<?xml version="1.0" encoding="UTF-8"?>
<project xmlns="http://maven.apache.org/POM/4.0.0"
         xmlns:xsi="http://www.w3.org/2001/XMLSchema-instance"
         xsi:schemaLocation="http://maven.apache.org/POM/4.0.0 http://maven.apache.org/xsd/maven-4.0.0.xsd">
    ...
    <parent>
        <groupId>org.springframework.boot</groupId>
        <artifactId>spring-boot-starter-parent</artifactId>
        <version>2.2.2.RELEASE</version>
    </parent>

    <build>
        <plugins>
            <plugin>
                <groupId>org.springframework.boot</groupId>
                <artifactId>spring-boot-maven-plugin</artifactId>
            </plugin>
        </plugins>
    </build>
    ...
</project>
这里引入了springBoot为maven开发的构建插件,这个插件其实非常常用,但我一直以来都不知道这个插件是干嘛的。在这里,我就顺便查看一下。
见识一下spring-boot-maven-plugin
首先我们来确定这个插件的版本,我们这里没有指定版本号,那么有两种可能,一个是默认使用了最新的版本,要么是从parent的<build><buildManagement/></build>中指定了版本。我们在parent.parent中找到这一段代码:
<?xml version="1.0" encoding="utf-8"?>
<project xmlns="http://maven.apache.org/POM/4.0.0" xmlns:xsi="http://www.w3.org/2001/XMLSchema-instance"
         xsi:schemaLocation="http://maven.apache.org/POM/4.0.0 http://maven.apache.org/xsd/maven-4.0.0.xsd">
    ...
    <build>
        ...
        <pluginManagement>
            <plugin>
                <groupId>org.springframework.boot</groupId>
                <artifactId>spring-boot-maven-plugin</artifactId>
                <version>2.2.2.RELEASE</version>
            </plugin>
        </pluginManagement>
        ...
    </build>
</project>
破案,我们这里使用的的版本是2.2.2.RELEASE。好了我们再看parent中的设定,可以找到这样的代码:
<?xml version="1.0" encoding="utf-8"?>
<project xmlns="http://maven.apache.org/POM/4.0.0" xmlns:xsi="http://www.w3.org/2001/XMLSchema-instance"
         xsi:schemaLocation="http://maven.apache.org/POM/4.0.0 http://maven.apache.org/xsd/maven-4.0.0.xsd">
    ...
    <build>
        ...
        <pluginManagement>
            <plugin>
                <groupId>org.springframework.boot</groupId>
                <artifactId>spring-boot-maven-plugin</artifactId>
                <executions>
                    <execution>
                        <id>repackage</id>
                        <goals>
                            <goal>repackage</goal>
                        </goals>
                    </execution>
                </executions>
                <configuration>
                    <mainClass>${start-class}</mainClass>
                </configuration>
            </plugin>
        </pluginManagement>
        ...
    </build>
</project>
可见,这个plugin执行了一个goal,就是repackage。在spring关于该插件的官网上我们可以看到,这个goal的作用是把所有应用所需的依赖全部打包到一起,创建一个可执行的打包文件(可执行的意思是通过java -jar来执行)。之所以叫repackage,是因为它在maven默认的打包的基础上(Super POM中指定了一部分,然后用户在<packaging>标签中指定了一部分),重新打包而成的。它将原来的不可执行的jar包打包为可执行的jar包(这一句话其实不太准确,因为我们也可以通过配置插件,让maven直接打包出可执行jar包来,但maven默认的设置里,<packaging>jar</packaing>打包出的jar文件的确是不可执行的)。在重新打包以后,maven所打的包被重命名为xx.original,而repackage后的包被命名为我们指定的<app>name</app>的名字(或者在super POM中指定的默认的名字)
这个插件到底是怎么重打包的呢?官网上说
这个插件重写了manifest文件,特别是管理了Main-Class和Start-Class这两个重要入口。
在上文:jar包中的资源文件那一节,提到的manifest文件里,可以看到这样的内容:
Manifest-Version: 1.0
Implementation-Title: Demo
Implementation-Version: 0.0.1-SNAPSHOT
Start-Class: com.lifestory.MyApplication
Spring-Boot-Classes: BOOT-INF/classes/
Spring-Boot-Lib: BOOT-INF/lib/
Build-Jdk-Spec: 1.8
Spring-Boot-Version: 2.1.8.RELEASE
Created-By: Maven Jar Plugin 3.2.0
Main-Class: org.springframework.boot.loader.JarLauncher
众所周知,Main-Class是从JVM虚拟机角度看过去的入口类,那么Start-Class是啥玩意?这是SpringBoot专用的功能,就是当Main-Class启动起来以后,org.springframework.boot.loader.JarLauncher会根据Start-Class的指示,寻找我们代码真正的启动类(一般就是标注@SpringBootApplication的那个类)
但是,当默认设置有问题时,我们就必须在SpringBoot的这个插件里手动配置属性了(高端内容,建议去上面给出的链接里看详情)
需要注意的是,Spring-boot-maven-plugin这个插件还有很多参数可以设置,支持很多高端特性,甚至包括对docker layer的支持。默认行为比如说目录结构、打包格式、目录结构、是否install到本地repository、打包时排除依赖等行为都可以被改变。当然这个属于高端内容,而且属于具体插件的行为,并非maven本身的行为,因此对于这些高端用法不做展开,可以自行到spring关于该插件的官网上上查看。
所以我现在就明白了这个命令的含义
mvn spring-boot:run
这是通过命令行运行SpringBoot程序的方式,显然, 这个意思是:运行插件spring-boot的run这个goal,而这个goal的具体工作,恰好是运行SpringBoot程序。
phase与goal
正如上文所说,一个lifecycle分为多个phase,而每个步骤可以绑定多个goal,插件提供这些goal。一个典型的插件使用栗子如下:
<plugin>
  <groupId>org.codehaus.modello</groupId>
  <artifactId>modello-maven-plugin</artifactId>
  <version>1.8.1</version>
  <executions>
    <execution>
      <configuration>
        <models>
          <model>src/main/mdo/maven.mdo</model>
        </models>
        <version>4.0.0</version>
      </configuration>
      <goals>
        <goal>java</goal>
      </goals>
    </execution>
  </executions>
</plugin>
在这里,我们使用了org.codehaus.modello:modello-maven-plugin:1.8.1的java这个goal,参数是一个model的list,这个goal绑定于generate-sources步骤上,这个绑定是插件默认的,所以无需在这里显式指定。
那么,假如一个goal可以绑定于多个步骤,比如说,一个类似于check完整性的goal,那么这goal绑定的步骤就很难有一个合理的默认值,对于这种情况,我们就必须显式指定一个goal绑定的步骤,类似下面这样:
<plugin>
  <groupId>com.mycompany.example</groupId>
  <artifactId>display-maven-plugin</artifactId>
  <version>1.0</version>
  <executions>
    <execution>
      <phase>process-test-resources</phase>
      <goals>
        <goal>time</goal>
      </goals>
    </execution>
  </executions>
</plugin>
显式指定了process-test-resources步骤。
资源文件怎么办
打包资源文件
既然jar包是一个打包文件,那么我们自然希望我们的资源文件也被打包到jar包里,这样能极大简化应用的分发过程。在maven中,不需要改变POM文件就能把资源文件打包到jar包的方法也很简单,那就是依赖标准文件夹结构,你只要把资源文件放在main/resources文件夹下面就可以了。默认情况下,maven在打包时会把所有的资源文件原封不动地复制到jar包的根目录,比如说,下面的这个源代码目录结构:
my-app
|-- pom.xml
`-- src
    |-- main
    |   |-- java
    |   |   `-- com
    |   |       `-- mycompany
    |   |           `-- app
    |   |               `-- App.java
    |   `-- resources
    |       `-- META-INF
    |           `-- application.properties
    `-- test
        |-- java
        |   `-- com
        |       `-- mycompany
        |           `-- app
        |               `-- AppTest.java
        `-- resources
            `-- test.properties
在默认情况下打包后,jar包的内部结构是这样的
|-- META-INF
|   |-- MANIFEST.MF
|   |-- application.properties
|   `-- maven
|       `-- com.mycompany.app
|           `-- my-app
|               |-- pom.properties
|               `-- pom.xml
`-- com
    `-- mycompany
        `-- app
            `-- App.class
在test目录下的资源文件,读取时和main目录下的资源文件路径一样,比如说,上面的test.propertites,读取时可以使用下面的代码:
InputStream is = getClass().getResourceAsStream("/test.properties" );
要注意这里的文件路径的前缀"/",这并非unix系统的根路径的意思,而是:class loader根,可参阅这篇文章
包含或排除资源文件
好吧,显然我们会有需求,在打包时打包进去一些文件/或者不打包一些文件,或者把资源文件的位置进行一些修改。比如官网举了个例子(我觉得举的不是很好,但我懒得想其他例子了……)
For example, a Plexus project requires a
configuration.xmlfile (which specifies component configurations to the container) to live within theMETA-INF/plexusdirectory. Although we could just as easily place this file withinsrc/main/resources/META-INF/plexus, we want instead to give Plexus its own directory ofsrc/main/plexus. In order for the JAR plugin to bundle the resource correctly, you would specify resources similar to the following:
<project xmlns="http://maven.apache.org/POM/4.0.0" xmlns:xsi="http://www.w3.org/2001/XMLSchema-instance"
  xsi:schemaLocation="http://maven.apache.org/POM/4.0.0 https://maven.apache.org/xsd/maven-4.0.0.xsd">
  <build>
    ...
    <resources>
      <resource>
        <targetPath>META-INF/plexus</targetPath>
        <directory>${basedir}/src/main/plexus</directory>
        <includes>
          <include>configuration.xml</include>
        </includes>
        <excludes>
          <exclude>**/*.properties</exclude>
        </excludes>
      </resource>
    </resources>
    <testResources>
      ...
    </testResources>
    ...
  </build>
</project>
可以看到,我们将${basedir}/src/main/plexus下的文件,在打包时移动到了META-INF/plexus这个目录下,在移动时,我们仅移动configuration.xml,而排除所有其他的.properties文件。
- resources: is a list of resource elements that each describe what and where to include files associated with this project.
- targetPath: Specifies the directory structure to place the set of resources from a build. Target path defaults to the base directory. A commonly specified target path for resources that will be packaged in a JAR is META-INF.
- directory: This element’s value defines where the resources are to be found. The default directory for a build is
${basedir}/src/main/resources. - includes: A set of files patterns which specify the files to include as resources under that specified directory, using * as a wildcard.
- excludes: The same structure as
includes, but specifies which files to ignore. In conflicts betweenincludeandexclude,excludewins. - testResources: The
testResourceselement block containstestResourceelements. Their definitions are similar toresourceelements, but are naturally used during test phases. The one difference is that the default (Super POM defined) test resource directory for a project is${basedir}/src/test/resources. Test resources are not deployed.
这个例子已经非常清晰了~就酱紫吧。
构建时修改资源文件
SomeTimes,资源文件中的一些值,需要打包时才确定。比如说:我们想要使用打包时间替换资源文件中的某些变量(可能是前后端一体项目里为了给js加个后缀从而达到清缓存的目的),就非常需要打包时修改资源文件。为了实现这个特性,首先要在你的资源文件里使用${<property name>}做占位符。之后,你需要把这个变量定义在
- pom文件中,或者
- 用户的setting.xml中,或者
- 外部properties文件中,或者
- 系统变量中,或者
- 打包时在命令行里使用
-Dname=value定义,或者 - 这玩意本身就是个maven预定义变量
这个修改行为发生在打包时,把资源文件从你的文件系统拷贝到target目录的过程中(实际上,是default lifecycle的process-resources步骤)。要使这个修改发生,只需要在上面的那个<resource>块中加入<filtering>标签即可,如下:
<project xmlns="http://maven.apache.org/POM/4.0.0" xmlns:xsi="http://www.w3.org/2001/XMLSchema-instance"
  xsi:schemaLocation="http://maven.apache.org/POM/4.0.0 https://maven.apache.org/xsd/maven-4.0.0.xsd">
  <modelVersion>4.0.0</modelVersion>

    ...
  <build>
    <resources>
      <resource>
        <directory>src/main/resources</directory>
        <filtering>true</filtering>
      </resource>
    </resources>
  </build>
</project>
- filtering: 一个布尔值,指示是否对当前资源文件进行修改替换,默认值是false。替换的值来自于上面所列的6个位置。
当使用filter时,必须显式指定<directory>,并且因为filtering的默认值是false,还必须显式指定filtering值为true.需要注意的是,在用户的setting.xml文件中定义的变量,在待替换的resources文件中要以settings前缀引用,比如${settings.localRepository},显然这样含义更明确,因为毕竟settings.xml文件距离项目有点远。
上面的6个变量来源中,第三个变量来源比较不好理解,这其实就是把所有要替换的变量聚合起来,放到一个外部.propertites文件中,比如说,我们创建了这么一个文件src/main/filters/filter.properties:
# filter.properties
my.filter.value=hello!
而要应用这个文件到resources文件中,只需要在pom文件中添加:
<project xmlns="http://maven.apache.org/POM/4.0.0" xmlns:xsi="http://www.w3.org/2001/XMLSchema-instance"
  xsi:schemaLocation="http://maven.apache.org/POM/4.0.0 https://maven.apache.org/xsd/maven-4.0.0.xsd">
  <modelVersion>4.0.0</modelVersion>
    ...
  <build>
    <filters>
      <filter>src/main/filters/filter.properties</filter>
    </filters>
    <resources>
      <resource>
        <directory>src/main/resources</directory>
        <filtering>true</filtering>
      </resource>
    </resources>
  </build>
</project>
显然,这个外部文件可以是多个。
再见POM
看过了上面的内容,我们对maven就有个概略的了解,知道maven如何管理依赖,又如何通过lifecycle和插件的结合来构建项目,还知道了maven如何处理资源文件。那么接下来就有必要进一步了解这些操作具体在POM文件中是怎么存在的。毕竟,POM是一站式的配置中心,所有以上概念、操作、理念,最终都要落实到POM的标签中去。
Overview
<project xmlns="http://maven.apache.org/POM/4.0.0" xmlns:xsi="http://www.w3.org/2001/XMLSchema-instance"
  xsi:schemaLocation="http://maven.apache.org/POM/4.0.0 https://maven.apache.org/xsd/maven-4.0.0.xsd">
  <modelVersion>4.0.0</modelVersion>

  <!-- The Basics -->
  <groupId>...</groupId>
  <artifactId>...</artifactId>
  <version>...</version>
  <packaging>...</packaging>
  <dependencies>...</dependencies>
  <parent>...</parent>
  <dependencyManagement>...</dependencyManagement>
  <modules>...</modules>
  <properties>...</properties>

  <!-- Build Settings -->
  <build>...</build>
  <reporting>...</reporting>

  <!-- More Project Information -->
  <name>...</name>
  <description>...</description>
  <url>...</url>
  <inceptionYear>...</inceptionYear>
  <licenses>...</licenses>
  <organization>...</organization>
  <developers>...</developers>
  <contributors>...</contributors>

  <!-- Environment Settings -->
  <issueManagement>...</issueManagement>
  <ciManagement>...</ciManagement>
  <mailingLists>...</mailingLists>
  <scm>...</scm>
  <prerequisites>...</prerequisites>
  <repositories>...</repositories>
  <pluginRepositories>...</pluginRepositories>
  <distributionManagement>...</distributionManagement>
  <profiles>...</profiles>
</project>
minimal POM
如上所述,最小的POM文件也得包含下面几个部分
<project xmlns="http://maven.apache.org/POM/4.0.0" xmlns:xsi="http://www.w3.org/2001/XMLSchema-instance"
  xsi:schemaLocation="http://maven.apache.org/POM/4.0.0 https://maven.apache.org/xsd/maven-4.0.0.xsd">
  <modelVersion>4.0.0</modelVersion>

  <groupId>org.codehaus.mojo</groupId>
  <artifactId>my-project</artifactId>
  <version>1.0</version>
</project>
packaging
如上所述,该标签通过指定最终打包文件的输出格式,实际上指定了一个lifecycle、并且指定了一系列与之绑定的插件,从而指示maven将一系列代码、资源文件最终打包成我们指定的格式,比如说:
<project xmlns="http://maven.apache.org/POM/4.0.0" xmlns:xsi="http://www.w3.org/2001/XMLSchema-instance"
  xsi:schemaLocation="http://maven.apache.org/POM/4.0.0 https://maven.apache.org/xsd/maven-4.0.0.xsd">
  ...
  <packaging>war</packaging>
  ...
</project>
该标签的默认值是jar,可选值包括:pom, jar, maven-plugin, ejb, war, ear, rar,可以在这个链接查询到不同的取值所包含的具体步骤和相应的插件。
dependencies
如上已列出的:
<project xmlns="http://maven.apache.org/POM/4.0.0" xmlns:xsi="http://www.w3.org/2001/XMLSchema-instance"
  xsi:schemaLocation="http://maven.apache.org/POM/4.0.0 https://maven.apache.org/xsd/maven-4.0.0.xsd">
  ...
  <dependencies>
    <dependency>
      <groupId>junit</groupId>
      <artifactId>junit</artifactId>
      <version>4.12</version>
      <classifier>javadoc</classifier>
      <type>jar</type>
      <scope>test</scope>
      <optional>true</optional>
    </dependency>
    ...
  </dependencies>
  ...
</project>
其中,scope、optional、excelutions金额classifier也已经介绍过了。这里说以下几个没说到的:
type
Corresponds to the chosen dependency type. This defaults to jar. While it usually represents the extension on the filename of the dependency, that is not always the case: a type can be mapped to a different extension and a classifier. The type often corresponds to the packaging used, though this is also not always the case. Some examples are jar, ejb-client and test-jar: see default artifact handlers for a list. New types can be defined by plugins that set extensions to true, so this is not a complete list.
systemPath
和system scope同时使用,指定一个本地文件系统的jar包位置(maven官方强烈不推荐)
version
这是个看起来简单,但实际上不简单的标签。版本号有软性要求和硬性要求两种,软性要求可以被在依赖树上出现的任意一个同artifact的其他版本覆盖,而硬性要求则指定一个强制性的版本,或者版本号范围,并且覆盖软性的版本要求。如果没有符合硬性要求的依赖,那么构建将会失败。举例如下:
1.0: Soft requirement for 1.0. Use 1.0 if no other version appears earlier in the dependency tree.-
[1.0]: Hard requirement for 1.0. Use 1.0 and only 1.0. -
(,1.0]: Hard requirement for any version <= 1.0. -
[1.2,1.3]: Hard requirement for any version between 1.2 and 1.3 inclusive. -
[1.0,2.0): 1.0 <= x < 2.0; Hard requirement for any version between 1.0 inclusive and 2.0 exclusive. -
[1.5,): Hard requirement for any version greater than or equal to 1.5. -
(,1.0],[1.2,): Hard requirement for any version less than or equal to 1.0 than or greater than or equal to 1.2, but not 1.1. Multiple requirements are separated by commas. -
(,1.1),(1.1,): Hard requirement for any version except 1.1; for example because 1.1 has a critical vulnerability.Maven picks the highest version of each project that satisfies all the hard requirements of the dependencies on that project. If no version satisfies all the hard requirements, the build fails.
关于version还有一个问题,就是既然version是一个字符串,那么,到底怎样的version是”higher”的?如果version满足x.y.z的标准版本号格式,那这个问题还比较简单,但比如说:”1-foo2” 和 “1-foo10“,到底谁是更高版本?关于这个有个复杂的规则,在这里不做探讨,可以参考官方文档
exclusions
常规用法:
<project xmlns="http://maven.apache.org/POM/4.0.0" xmlns:xsi="http://www.w3.org/2001/XMLSchema-instance"
  xsi:schemaLocation="http://maven.apache.org/POM/4.0.0 https://maven.apache.org/xsd/maven-4.0.0.xsd">
  ...
  <dependencies>
    <dependency>
      <groupId>org.apache.maven</groupId>
      <artifactId>maven-embedder</artifactId>
      <version>2.0</version>
      <exclusions>
        <exclusion>
          <groupId>org.apache.maven</groupId>
          <artifactId>maven-core</artifactId>
        </exclusion>
      </exclusions>
    </dependency>
    ...
  </dependencies>
  ...
</project>
进阶用法:
<project xmlns="http://maven.apache.org/POM/4.0.0" xmlns:xsi="http://www.w3.org/2001/XMLSchema-instance"
  xsi:schemaLocation="http://maven.apache.org/POM/4.0.0 https://maven.apache.org/xsd/maven-4.0.0.xsd">
  ...
  <dependencies>
    <dependency>
      <groupId>org.apache.maven</groupId>
      <artifactId>maven-embedder</artifactId>
      <version>3.1.0</version>
      <exclusions>
        <exclusion>
          <groupId>*</groupId>
          <artifactId>*</artifactId>
        </exclusion>
      </exclusions>
    </dependency>
    ...
  </dependencies>
  ...
</project>
相当于只引入maven-embedder的
Build
build无疑是个复杂的标签,复杂主要复杂在,在这个标签里可以引入绑定于步骤的的各种插件,因为插件的行为千差万别,所以build这部分的配置变化也很多(主要变化还是在插件的配置上)
build标签可以存在于两个位置,一个位置是project顶级标签下面,一个是在project>profiles标签下面,如下:
<project xmlns="http://maven.apache.org/POM/4.0.0" xmlns:xsi="http://www.w3.org/2001/XMLSchema-instance"
  xsi:schemaLocation="http://maven.apache.org/POM/4.0.0 https://maven.apache.org/xsd/maven-4.0.0.xsd">
  ...
  <!-- "Project Build" contains more elements than just the BaseBuild set -->
  <build>...</build>

  <profiles>
    <profile>
      <!-- "Profile Build" contains a subset of "Project Build"s elements -->
      <build>...</build>
    </profile>
  </profiles>
</project>
对于这两个不同位置的build来说,有一些共同的子标签可以使用,这些两处都可以使用的子标签的集合,maven称之为BaseBuild Element,下面介绍这一部分。
简单的子标签
<build>
  <defaultGoal>install</defaultGoal>
  <directory>{basedir}/target</directory>
  <finalName>{artifactId}-${version}</finalName>
  <filters>
    <filter>filters/filter1.properties</filter>
  </filters>
  ...
</build>
似乎没什么好解释的……
Resources
上面的资源文件怎么办里面已经说得比较清楚了,不如在这里回顾(测试)一下:
<project xmlns="http://maven.apache.org/POM/4.0.0" xmlns:xsi="http://www.w3.org/2001/XMLSchema-instance"
  xsi:schemaLocation="http://maven.apache.org/POM/4.0.0 https://maven.apache.org/xsd/maven-4.0.0.xsd">
  <build>
    ...
    <resources>
      <resource>
        <targetPath>META-INF/plexus</targetPath>
        <filtering>false</filtering>
        <directory>${basedir}/src/main/plexus</directory>
        <includes>
          <include>configuration.xml</include>
        </includes>
        <excludes>
          <exclude>**/*.properties</exclude>
        </excludes>
      </resource>
    </resources>
    <testResources>
      ...
    </testResources>
    ...
  </build>
</project>
plugins
回顾一下:
<project xmlns="http://maven.apache.org/POM/4.0.0" xmlns:xsi="http://www.w3.org/2001/XMLSchema-instance"
  xsi:schemaLocation="http://maven.apache.org/POM/4.0.0 https://maven.apache.org/xsd/maven-4.0.0.xsd">
  <build>
    ...
    <plugins>
      <plugin>
        <groupId>org.apache.maven.plugins</groupId>
        <artifactId>maven-jar-plugin</artifactId>
        <version>2.6</version>
        <extensions>false</extensions>
        <inherited>true</inherited>
        <configuration>
          <classifier>test</classifier>
        </configuration>
        <dependencies>...</dependencies>
        <executions>...</executions>
      </plugin>
    </plugins>
  </build>
</project>
- extensions:布尔值,是否加载该插件的extensions。
-
inherited:布尔值,指是否该插件配置会影响继承该POM文件的子POM文件。默认值是true
-
configuration
这一个部分主要复杂的在于父子configuration的合并和覆盖。规则是:假如父POM的inherited属性为false,则子POM的configuration完全不受父POM的影响;否则,子POM的同名configuration覆盖父POM的configuration,而不同名configuration则合并,比如下面两个POM。
<plugin>
<!--> 父POM </-->
<groupId>my.group</groupId>
<artifactId>my-plugin</artifactId>
<configuration>
  <items>
    <item>parent-1</item>
    <item>parent-2</item>
  </items>
  <properties>
    <parentKey>parent</parentKey>
  </properties>
</configuration>
</plugin>
<plugin> <!--> 子POM </--> <groupId>my.group</groupId> <artifactId>my-plugin</artifactId> <configuration> <items> <item>child-1</item> </items> <properties> <childKey>child</childKey> </properties> </configuration> </plugin><plugin> <!--> 合并后 </--> <groupId>my.group</groupId> <artifactId>my-plugin</artifactId> <configuration> <items> <item>child-1</item> </items> <properties> <childKey>child</childKey> <parentKey>parent</parentKey> </properties> </configuration> </plugin>更精细一点,可以使用
combain.children和combain.self来控制configuration合并。如child如果是下面的配置<configuration> <items combine.children="append"> <!-- combine.children="merge" is the default --> <item>child-1</item> </items> <properties combine.self="override"> <!-- combine.self="merge" is the default --> <childKey>child</childKey> </properties> </configuration>则合并后的结果是:
<configuration>
<items combine.children="append">
  <item>parent-1</item>
  <item>parent-2</item>
  <item>child-1</item>
</items>
<properties combine.self="override">
  <childKey>child</childKey>
</properties>
</configuration>
其中,append是合并,而override则表示子完全覆盖父。刚好是默认行为的反面。
-
dependencies:管理该插件的依赖。
-
executions
一个插件可能有多个goal,而且一个goal也可以绑定在多个步骤,一个goal也可能执行多次。所以,需要executions标签来显式指定到底哪些goal需要被执行,以及该goal此次执行的参数有哪些,示例如下:
<project xmlns="http://maven.apache.org/POM/4.0.0" xmlns:xsi="http://www.w3.org/2001/XMLSchema-instance"
xsi:schemaLocation="http://maven.apache.org/POM/4.0.0 https://maven.apache.org/xsd/maven-4.0.0.xsd">
...
<build>
  <plugins>
    <plugin>
      <artifactId>maven-antrun-plugin</artifactId>
      <version>1.1</version>
      <executions>
        <execution>
          <id>echodir</id>
          <goals>
            <goal>run</goal>
          </goals>
          <phase>verify</phase>
          <inherited>false</inherited>
          <configuration>
            <tasks>
              <echo>Build Dir: ${project.build.directory}</echo>
            </tasks>
          </configuration>
        </execution>
      </executions>

    </plugin>
  </plugins>
</build>
</project>
这个意思是将
maven-antrun-plugin插件的rungoal,绑定在vertify阶段,执行一次。
pluginManagement
和plugin标签同级的一个标签,其配置和plugin标签非常之一致,而且,既然明白了dependencyManagement的概念,相比这个概念也不难理解。它也是先配置好一个plugin,从而子POM直接引用plugin,而不用再添加多余的配置。
接下来就是project下直属的二级标签build专属的一些子标签了。
Directories
这是一系列标签的统称,因为文件夹结构是对整个POM而言的,不存在profile的可能,因此不可能在profile里保存这些数据。这些标签包括:
<project xmlns="http://maven.apache.org/POM/4.0.0" xmlns:xsi="http://www.w3.org/2001/XMLSchema-instance"
  xsi:schemaLocation="http://maven.apache.org/POM/4.0.0 https://maven.apache.org/xsd/maven-4.0.0.xsd">
  ...
  <build>
    <sourceDirectory>{basedir}/src/main/java</sourceDirectory>
    <scriptSourceDirectory>{basedir}/src/main/scripts</scriptSourceDirectory>
    <testSourceDirectory>{basedir}/src/test/java</testSourceDirectory>
    <outputDirectory>{basedir}/target/classes</outputDirectory>
    <testOutputDirectory>${basedir}/target/test-classes</testOutputDirectory>
    ...
  </build>
</project>
Extensions
这是在build中使用的一系列插件的总和,将会在包含在运行时的build的classpath中,用以增强build的功能。(妈的完全没明白是啥玩意)
reporting
这个标签是用来在site步骤生成报表的……没见过哪里用过,网上甚至也查不到什么有用的消息,暂且不管了……
更多项目信息
简单的子标签
- name: Projects tend to have conversational names, beyond the
artifactId. The Sun engineers did not refer to their project as “java-1.5”, but rather just called it “Tiger”. Here is where to set that value. - description: Description of a project is always good. Although this should not replace formal documentation, a quick comment to any readers of the POM is always helpful.
- url: The URL, like the name, is not required. This is a nice gesture for projects users, however, so that they know where the project lives.
- inceptionYear: This is another good documentation point. It will at least help you remember where you have spent the last few years of your life.
Licenses
目前似乎还没有牛逼到需要写这个标签……不过人还是……要有梦想的嘛
<licenses>
  <license>
    <name>Apache License, Version 2.0</name>
    <url>https://www.apache.org/licenses/LICENSE-2.0.txt</url>
    <distribution>repo</distribution>
    <comments>A business-friendly OSS license</comments>
  </license>
</licenses>
Organization
<project xmlns="http://maven.apache.org/POM/4.0.0" xmlns:xsi="http://www.w3.org/2001/XMLSchema-instance"
  xsi:schemaLocation="http://maven.apache.org/POM/4.0.0 https://maven.apache.org/xsd/maven-4.0.0.xsd">
  ...
  <organization>
    <name>Codehaus Mojo</name>
    <url>http://mojo.codehaus.org</url>
  </organization>
</project>
Developers
你叫我做浮夸吧……夸张只因我很怕,只闷头写代码的话,谁知道我是谁啊……
<project xmlns="http://maven.apache.org/POM/4.0.0" xmlns:xsi="http://www.w3.org/2001/XMLSchema-instance"
  xsi:schemaLocation="http://maven.apache.org/POM/4.0.0 https://maven.apache.org/xsd/maven-4.0.0.xsd">
  ...
  <developers>
    <developer>
      <id>jdoe</id>
      <name>John Doe</name>
      <email>jdoe@example.com</email>
      <url>http://www.example.com/jdoe</url>
      <organization>ACME</organization>
      <organizationUrl>http://www.example.com</organizationUrl>
      <roles>
        <role>architect</role>
        <role>developer</role>
      </roles>
      <timezone>America/New_York</timezone>
      <properties>
        <picUrl>http://www.example.com/jdoe/pic</picUrl>
      </properties>
    </developer>
  </developers>
  ...
</project>
Contributors
<project xmlns="http://maven.apache.org/POM/4.0.0" xmlns:xsi="http://www.w3.org/2001/XMLSchema-instance"
  xsi:schemaLocation="http://maven.apache.org/POM/4.0.0 https://maven.apache.org/xsd/maven-4.0.0.xsd">
  ...
  <contributors>
    <contributor>
      <name>Noelle</name>
      <email>some.name@gmail.com</email>
      <url>http://noellemarie.com</url>
      <organization>Noelle Marie</organization>
      <organizationUrl>http://noellemarie.com</organizationUrl>
      <roles>
        <role>tester</role>
      </roles>
      <timezone>America/Vancouver</timezone>
      <properties>
        <gtalk>some.name@gmail.com</gtalk>
      </properties>
    </contributor>
  </contributors>
  ...
</project>
环境设置相关标签
呃……看了一遍,都不怎么常用,懒得翻译复制粘贴了(其实更多项目信息那里开始就没啥大用了),这里有更多信息可以看。
概括总结
自此,我们基本了解了maven的各种用法(既然所有设置都在pom文件里,那么了解了pom文件的每一个标签,基本也就是了解了maven)
我们知道,maven是一个项目构建工具,它的主业就是构建(build),但是它提供的功能又不仅于此,在构建以外,它提供的最有用的功能就是依赖管理。
maven的设计哲学就是便携性和统一,为此,maven设计了一个合理的文件目录结构,要求代码、资源文件、测试代码、测试资源文件放在固定的、合理的位置,这使得maven的使用者在不同的文件之间穿梭切换成本大大降低;maven将构建的最佳实践总结为构建的多个步骤,并将其组织起来成为三个lifecycle,在每个lifecycle里,步骤都是一个接一个有序地进行,我们只能通过将插件提供的功能(goal)绑定到特定的步骤上来改变maven的构建行为,这使得maven的构建随意性远远小于ant,这中统一也为maven中大量合理的默认值提供了基础,大大简化了程序员的配置;maven设计了项目仓库的概念,将所有依赖尽可能的通过仓库的形式组织起来,极大降低了在不同电脑上切换时项目所受的影响,加上java本身的跨平台特性,做到了逐byte还原的高便携性。
通过maven,我们可以管理依赖、构建代码、管理资源文件,并将最终成果或打包成jar、war包进行发布,或发布到代码仓库作为其他项目的依赖。
maven无疑是非常成功的项目,也是java程序员最常使用到的工具,希望这篇文章能足够全面……
但是,即便maven已经如此成功,后起之秀gradle仍然来势汹汹,不断攻城略地,也取得了巨大的成功。自然所有的成功都不可能是偶然,gradle的成功显然有它的优秀之处,我们以后再来探讨gradle……so,敬请期待……


0 条评论