手动更新openssl及nginx,支持http2
折腾党的原则就是,管他有没有用,先折腾上去再说。
比如说http2,虽然我不是很懂原理。感觉就是从http1.1的面向字节的首部改成了纯二进制流,并且允许在一个TCP请求中携带多个http request,从而解决了TCP并发连接数量较少带来的加载速度问题。
据说这个网站:HTTP/2:the furture of the internet 可以直观看到HTTP2的优化。
不过要说能提高多少加载速度,谁知道呢,但是先折腾上去再说。
经查询,http2对openssl和nginx的版本都有最低要求,openssl是1.0.2t以上,而nginx是1.9以上。
既然要更新了,当然是直接更新到顶啦
安装环境
debian 8
据说lnmp之类的或者docker可以一键部署,不过我还是喜欢手动编译。
更新openssl
############################
wget https://www.openssl.org/source/openssl-1.1.0h.tar.gz
tar xvf openssl-1.1.0h.tar.gz
cd openssl-1.1.0h
./config shared zlib --openssldir="/usr/lib/ssl"
# 注意,上面的--openssldir="/usr/lib/ssl"是用openssl version -a命令查询出来的原来的安装目录,不同的机子可能不同
make
make install  # make install的时候注意看看装到哪里去了
# 下面这两个命令是备份原openssl以备不测
mv /usr/bin/openssl /usr/bin/openssl.bak
mv /usr/include/openssl /usr/include/openssl.bak
# 把新版的链接过来
ln -s /usr/local/sbin/openssl /usr/bin/openssl
ln -s /usr/local/include/openssl /usr/include/openssl

openssl version -a  #检查一下装好了没
# 结果报错:openssl: error while loading shared libraries: libssl.so.1.1: cannot open shared object file: No such file or directory,下面两个命令解决
ln -s /usr/local/lib/libssl.so.1.1 /usr/lib/libssl.so.1.1
ln -s /usr/local/lib/libcrypto.so.1.1 /usr/lib/libcrypto.so.1.1

openssl version -a  # 输出如下
OpenSSL 1.1.0h  27 Mar 2018
built on: reproducible build, date unspecified
platform: linux-x86_64
options:  bn(64,64) rc4(8x,char) des(int) idea(int) blowfish(ptr)
compiler: gcc -DZLIB -DDSO_DLFCN -DHAVE_DLFCN_H -DNDEBUG -DOPENSSL_THREADS -DOPENSSL_NO_STATIC_ENGINE -DOPENSSL_PIC -DOPENSSL_IA32_SSE2 -DOPENSSL_BN_ASM_MONT -DOPENSSL_BN_ASM_MONT5 -DOPENSSL_BN_ASM_GF2m -DSHA1_ASM -DSHA256_ASM -DSHA512_ASM -DRC4_ASM -DMD5_ASM -DAES_ASM -DVPAES_ASM -DBSAES_ASM -DGHASH_ASM -DECP_NISTZ256_ASM -DPADLOCK_ASM -DPOLY1305_ASM -DOPENSSLDIR="\"/usr/lib/ssl\"" -DENGINESDIR="\"/usr/local/lib/engines-1.1\""  -Wa,--noexecstack
OPENSSLDIR: "/usr/lib/ssl"
ENGINESDIR: "/usr/local/lib/engines-1.1"
这就算安装好了。
nginx编译安装
############################
wget http://nginx.org/download/nginx-1.14.0.tar.gz
tar xvf nginx-1.14.0.tar.gz
cd nginx-1.14.0

#接下来先看看之前的nginx编译参数是什么
nginx -V
# 把输出复制下来,删掉一些没用的配置,加上一些有用的配置,这个还得看自己取舍
# 特别是把各种path都复制上,尽量保证编译完了以后配置文件什么都不用动地方
# 我索性一次搞了一个很复杂的,懒人可以直接用
./configure --with-cc-opt='-g -O2 -fstack-protector-strong -Wformat -Werror=format-security -D_FORTIFY_SOURCE=2' --with-ld-opt=-Wl,-z,relro --prefix=/usr/share/nginx --conf-path=/etc/nginx/nginx.conf --http-log-path=/var/log/nginx/access.log --error-log-path=/var/log/nginx/error.log --lock-path=/var/lock/nginx.lock --pid-path=/run/nginx.pid --http-client-body-temp-path=/var/lib/nginx/body --http-fastcgi-temp-path=/var/lib/nginx/fastcgi --http-proxy-temp-path=/var/lib/nginx/proxy --http-scgi-temp-path=/var/lib/nginx/scgi --http-uwsgi-temp-path=/var/lib/nginx/uwsgi --with-debug --with-pcre-jit --with-http_ssl_module --with-http_stub_status_module --with-http_realip_module --with-http_auth_request_module --with-http_addition_module --with-http_dav_module --with-http_gzip_static_module --with-http_image_filter_module --with-http_sub_module --with-http_xslt_module --with-mail --with-mail_ssl_module --with-http_flv_module --with-http_mp4_module --with-http_gunzip_module --with-http_random_index_module --with-http_secure_link_module --with-threads --with-stream --with-stream_ssl_module --with-http_slice_module --with-file-aio --with-http_v2_module
# 上面的过程可能会报错,提示缺少这模块那模块的,大部分都不用再手动编译,直接apt install即可
make
make install
# 同样关注make install装到哪里去了
ln -s /usr/share/nginx/sbin/nginx /usr/sbin/nginx
nginx -V  # 输出如下
nginx version: nginx/1.14.0
built by gcc 4.9.2 (Debian 4.9.2-10)
built with OpenSSL 1.1.0h  27 Mar 2018
TLS SNI support enabled
configure arguments: --with-cc-opt='-g -O2 -fstack-protector-strong -Wformat -Werror=format-security -D_FORTIFY_SOURCE=2' --with-ld-opt=-Wl,-z,relro --prefix=/usr/share/nginx --conf-path=/etc/nginx/nginx.conf --http-log-path=/var/log/nginx/access.log --error-log-path=/var/log/nginx/error.log --lock-path=/var/lock/nginx.lock --pid-path=/run/nginx.pid --http-client-body-temp-path=/var/lib/nginx/body --http-fastcgi-temp-path=/var/lib/nginx/fastcgi --http-proxy-temp-path=/var/lib/nginx/proxy --http-scgi-temp-path=/var/lib/nginx/scgi --http-uwsgi-temp-path=/var/lib/nginx/uwsgi --with-debug --with-pcre-jit --with-http_ssl_module --with-http_stub_status_module --with-http_realip_module --with-http_auth_request_module --with-http_addition_module --with-http_dav_module --with-http_gzip_static_module --with-http_image_filter_module --with-http_sub_module --with-http_xslt_module --with-mail --with-mail_ssl_module --with-http_flv_module --with-http_mp4_module --with-http_gunzip_module --with-http_random_index_module --with-http_secure_link_module --with-threads --with-stream --with-stream_ssl_module --with-http_slice_module --with-file-aio --with-http_v2_module
再修改nginx配置文件,在需要启用http2的站点的server大括号里,修改listen后面的http2
############################
listen 443 ssl http2
重启nginx
############################
nginx -s reload
现在登录网页一下看看……Emmm,好像没区别?不要慌。如果用的是chrome浏览器,可以用下面这个页面看看。
chrome://net-internals/#http2
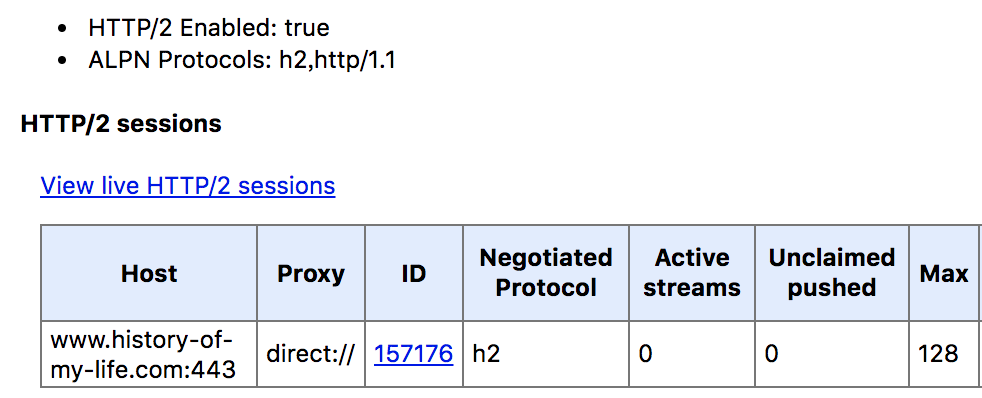
看到了,chrome与小站之间已经建立起稳定的http2连接啦!
收工~
OH~对啦,更新了openssl以后,nginx中的TLS配置可以更新到1.3了,就是在443的server里加上这句话,更激进一点的可以只支持TLS1.2和TLS1.3
ssl_protocols TLSv1 TLSV1.1 TLSv1.2 TLSv1.3


0 条评论